We are excited to have you join us on this journey to enhance your knowledge and skills in identity management, authentication, and authorization using Auth0. This series of hands-on labs will guide you through securing and improving the Identiflix application.
Identiflix is an educational Next.js web application designed to bridge the gap between identity experts and eager students. The application allows instructors to generate identity-related courses and for students to enroll and learn from them.
But Identiflix needs your help! The application, as it stands, is not secure; anyone can access and edit any content. We have received complaints from users who want to get rid of passwords, but that’s all we offer right now. Admins are eager to enforce that instructors use additional authentication factors such as OTP and security keys.
What We'll Be Building In This Guide
Together we'll go through the codebase of a e-learning style application that lets users enroll to courses, learn from the best identity experts, and more.
The focus of this guide is not on how to build and e-learning platform, so we're not going to spend time on this. We're going to have a look at how we can secure the application from different perspectives using Auth0.
In this lab, we'll cover the following topics:
- Auth0 account setup
- Project setup
The app is a Next.js app using App Router and is structured as followed:
/appcontains the pages for the Next.js application./app/auth/[auth0]/route.tscontains the API routes needed for authentication./app/actions.tscontains the actions (API endpoints) for the application.
/componentscontains the shared components./libcontains the utility functions./datacontains the data layer, including the data models and the data access API./data/db.jsoncontains the emulated data about courses.
Together that gives us an architecture that looks like this:

Requirements
Before we get started, let's make sure you have all you need to run this workshop:
- Node.js 18.17 or later.
- macOS, Windows (including WSL), and Linux are supported.
- A free Auth0 Account.
- We recommend creating a new account or new tenant for this exercise.

Quick Auth0 Set Up
First and foremost, if you haven't already, sign up for an Auth0 account to connect your web application with the Auth0 Identity Platform.
Next, you'll connect your web application with Auth0. You'll need to create an application registration in the Auth0 Dashboard and get three configuration values: the Auth0 Domain, the Auth0 Client ID, and the Auth0 Client Secret. You'll also need to define an Auth0 Audience value within your project to practice making secure calls to an external API.
Get the Auth0 domain and client ID
- Open the Applications section of the Auth0 Dashboard.
- Click on the Create Application button and fill out the form with the following values:
Identiflix App


- Click on the Create button.
An Auth0 Application page loads up.
As such, click on the "Settings" tab of your Auth0 Application page, locate the "Application URIs" section, and fill in the following values:
http://localhost:3000/api/auth/callback
http://localhost:3000
Scroll down and click the "Save Changes" button.
Next, locate the "Basic Information" section.
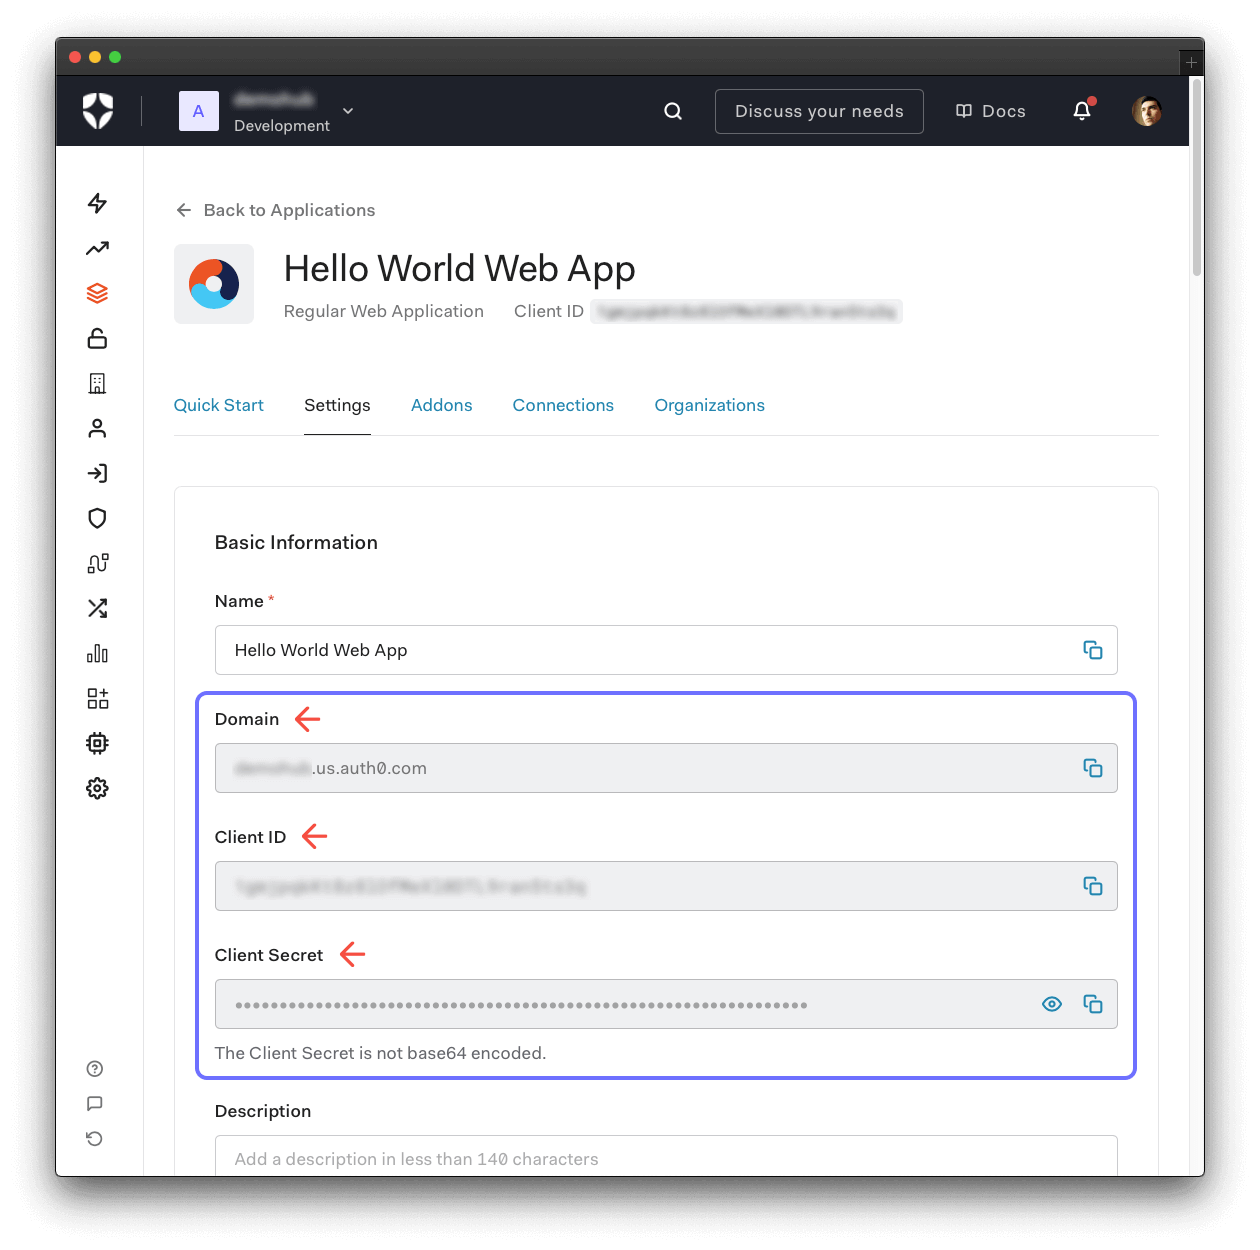
When you enter a value in the input fields present on this page, any code snippet that uses such value updates to reflect it. Using the input fields makes it easy to copy and paste code as you follow along.
As such, enter the "Domain" and "Client ID" values in the following fields to set up your web application in the next section:
Set Up the Next.js Application
Start by cloning the project into your local machine:
git clone https://github.com/oktadev/devday-24-labs-demo-app.git
Make the project directory your current working directory:
cd devday-24-labs-demo-app
Next, install the Next.js project dependencies:
npm install
You'll also need a session secret to sign the session ID cookie of your web application. Use the following command to generate a random secret key:
node -e "console.log(crypto.randomBytes(32).toString('hex'))"
Copy the long-string output from the terminal and paste it into the following input box:
Create a copy of the .env.local file under the root project directory:
cp .env.local.example .env.local
Populate the .env.local with the following environment variables:
AUTH0_SECRET=KEY-VALUEAUTH0_BASE_URL=http://localhost:3000AUTH0_ISSUER_BASE_URL=https://AUTH0-DOMAINAUTH0_CLIENT_ID=AUTH0-CLIENT-IDAUTH0_CLIENT_SECRET=AUTH0-CLIENT-SECRET
The AUTH0_BASE_URL is the base URL of your application.
Get the Auth0 Client Secret
Head back to the "Settings" tab of your Auth0 application page in the Auth0 Dashboard to get the value for AUTH0_CLIENT_SECRET.
Locate the "Client Secret" field, copy its value, and paste it as the AUTH0_CLIENT_SECRET environment value in the .env.local file.
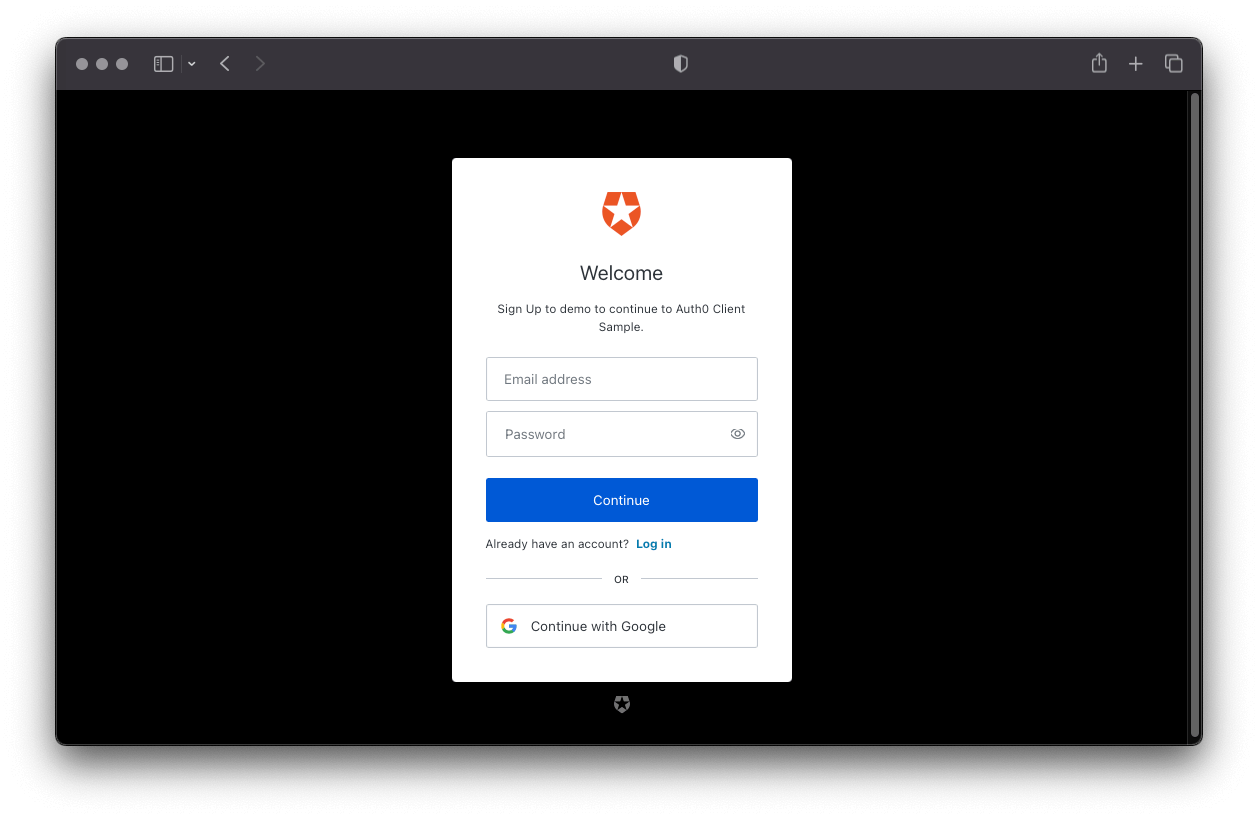
Once that's done, you can start or re-start your Next.js application and launch the web application at http://localhost:3000. If everything goes well, you should see a screen like the following:

Go ahead and try to log in. Your Next.js application redirects you to the Auth0 Universal Login page. You can use the form to log in with a username and password or a social identity provider like Google. Notice that this login page also gives you the option to sign up.

However, when you click the sign-up button from your application directly, Next.js takes you to the signup page, where your users can sign up for the Next.js application. Try it out!
Fantastic, you have now set up Identiflix in your local environment and you are ready to follow along in any of the lab sessions.
See you in the next lab!
Start the development server
To start the development server, and reload the applications whenever you make changes to the codebase, run the following comand. It will show the url (localhost + port) your application is running on, so you can open it in your browser.
npm run dev
Recap
In this lab, you set up Identiflix, a Next.js application with Auth0, and you are ready to continue working on any of the labs to keep enhancing the security, user experience and functionality of the application.
