

This guide demonstrates how to implement user authentication for a multi-tenant SaaS application using Auth0. You'll leverage the following Auth0 features: Organizations, Actions, Enterprise Connections in a Next.js web application using the Auth0 Next.js SDK and Auth0 Management Node.js SDK. This guide will help you to understand how to implement the following use cases:
- SaaS Multi-tenancy with Auth0 Organizations in a single Auth0 tenant.
- A tiered pricing model using Auth0 Actions and User Profile App Metadata.
- Support Trial, Personal, Teams, and Enterprise plans in a SaaS application.
- Trial plan expiration and user conversion using Auth0 Actions.
- Use Actions to update user profile data, enrich an ID or Access Token with custom claims, or call 3rd party APIs to manage user subscription status, such as the Stripe API.
- Self-service SSO for business users using the Auth0 Management API and Enterprise connections with support for OIDC connections.
- Self-service User Management using the Auth0 Management API.
Next.js SaaS Code Sample Specs
Throughout this guide, we'll build on a code sample using the following tools:
- Next.js
v13.2using thepagesrouter. - Auth0 Next.js SDK
v3 - Auth0 Management Node SDK
v3
We used npm v9 to install the dependencies of this Next.js and run the application using Node.js v18.
Quick Auth0 Set Up
First and foremost, if you haven't already, sign up for an Auth0 account to connect your web application with the Auth0 Identity Platform.
Next, you'll connect your web application with Auth0. You'll need to create an application registration in the Auth0 Dashboard and get three configuration values: the Auth0 Domain, the Auth0 Client ID, and the Auth0 Client Secret. You'll also need to define an Auth0 Audience value within your project to practice making secure calls to an external API.
Get the Auth0 domain and client ID
-
Open the Applications section of the Auth0 Dashboard.
-
Click on the Create Application button and fill out the form with the following values:
MyLearning SaaS


- Click on the Create button.
An Auth0 Application page loads up.
As such, click on the "Settings" tab of your Auth0 Application page, locate the "Application URIs" section, and fill in the following values:
http://localhost:3000/api/auth/callback
http://localhost:3000
Scroll down and click the "Save Changes" button.
Next, locate the "Basic Information" section.
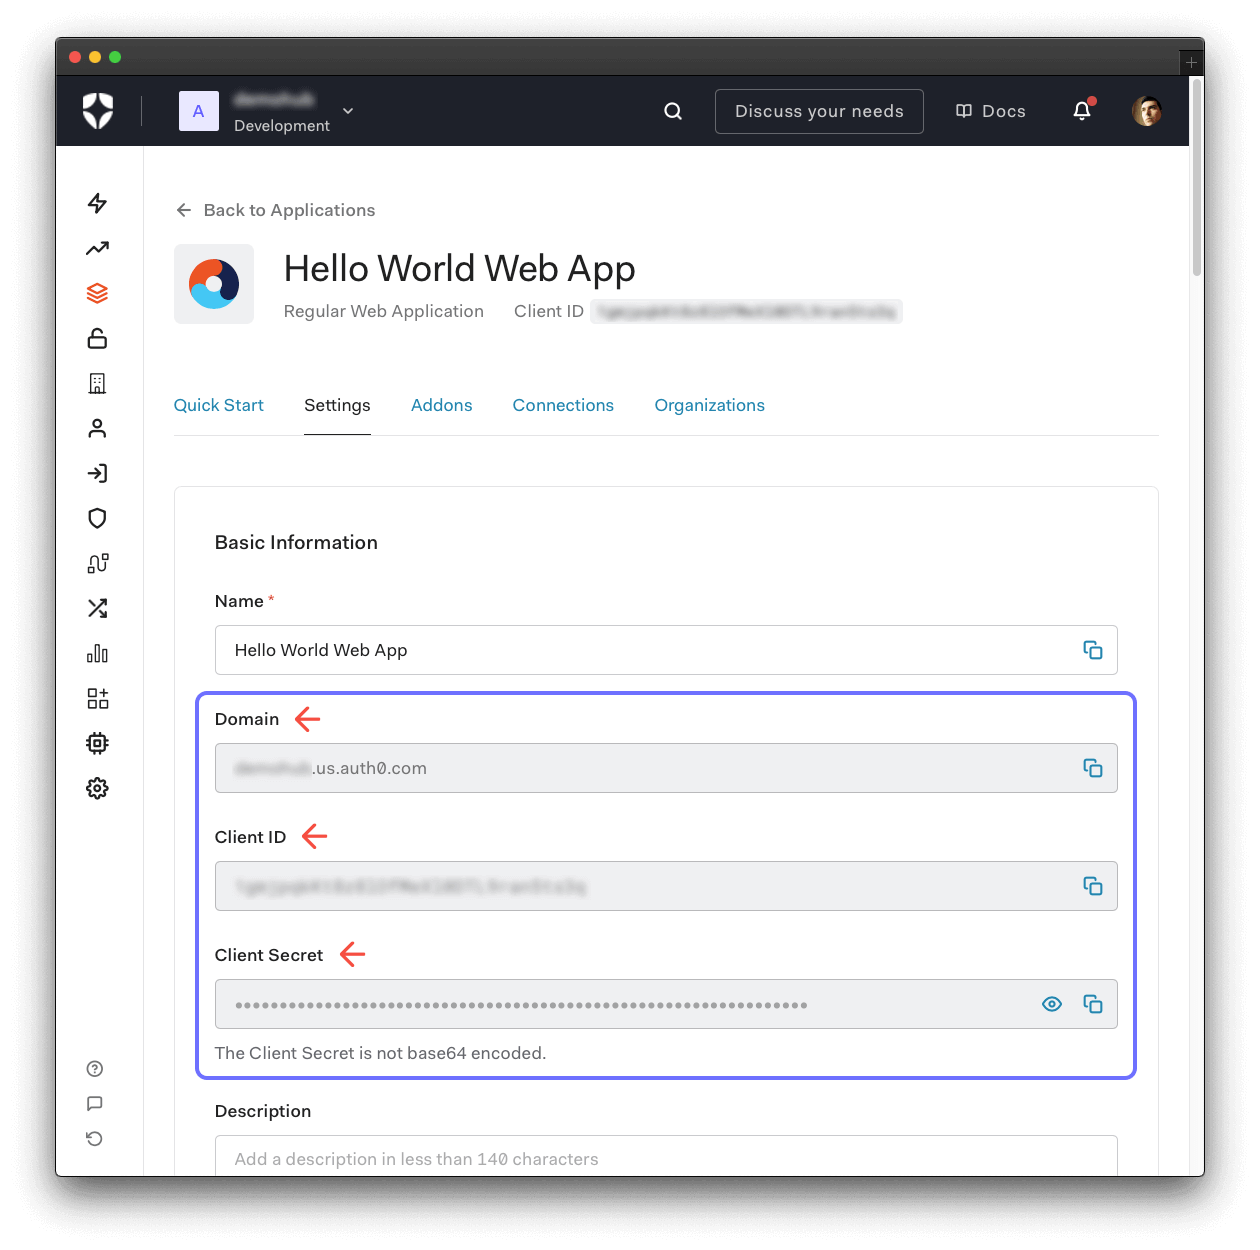
When you enter a value in the input fields present on this page, any code snippet that uses such value updates to reflect it. Using the input fields makes it easy to copy and paste code as you follow along.
As such, enter the "Domain" and "Client ID" values in the following fields to set up your web application in the next section:
Set Up the Next.js Application
Start by cloning the project into your local machine:
git clone https://github.com/auth0-developer-hub/web-app_nextjs_javascript_saas_pages-router.git
Make the project directory your current working directory:
cd web-app_nextjs_javascript_saas_pages-router
Next, install the Next.js project dependencies:
npm install
You'll also need a session secret to sign the session ID cookie of your web application. Use the following command to generate a random secret key:
node -e "console.log(crypto.randomBytes(32).toString('hex'))"
Copy the long-string output from the terminal and paste it into the following input box:
Create a .env.local file under the root project directory:
touch .env.local
Populate the .env.local with the following environment variables:
AUTH0_SECRET=KEY-VALUEAUTH0_BASE_URL=http://localhost:3000AUTH0_ISSUER_BASE_URL=https://AUTH0-DOMAINAUTH0_CLIENT_ID=AUTH0-CLIENT-IDAUTH0_CLIENT_SECRET=AUTH0-CLIENT-SECRET
The AUTH0_BASE_URL is the base URL of your application.
Get the Auth0 Client Secret
Head back to the "Settings" tab of your Auth0 application page in the Auth0 Dashboard to get the value for AUTH0_CLIENT_SECRET.
Locate the "Client Secret" field, copy its value, and paste it as the AUTH0_CLIENT_SECRET environment value in the .env.local file.
Set Up Auth0 Organizations
For this SaaS use case, you want to allow both consumers and business users to authenticate. Organizations in Auth0 enable companies to handle the authentication and authorization of their business partners and customers from a single Auth0 tenant.
You can set up Auth0 Organizations using the Dashboard or the Management API. You can define how users can log in by enabling a database, social, or enterprise connection and their relationship with the Auth0 organization through membership. You can also define the branding for the Organization using Universal login.
Before exploring all those Auth0 Organization configuration options, you must define in the Auth0 Dashboard the type of users that will log in to your application. Your options include:
-
Individuals for personal use: Users cannot log in using an organization.
-
Team members of organizations: Users must log in using an organization. When selected, you must either provide an organization when you redirect users to the
/authorizeendpoint or choose the Pre-login prompt as your Organization Prompt Type to allow users to select an organization before they log in. -
Both: Users can log in with an organization or without one.
- To configure Organizations for your application, navigate to the Auth0 Dashboard, locate the "Applications" tab, and select your application - "My Learning SaaS".
- Select the "Organizations" view and configure the following settings:
- "Before you get started " section:
- Click on "Disable Grants Now " to remove these grants from your application. When prompted, confirm the operation.
- In the "Types of Users" section. Select the "Both" option.
- In the "Login Flow" section. Choose the "Prompt for Credentials".
- Click on "Save Changes"
The Organization ID must be sent to the authorization parameter when calling the authorization server /authorize endpoint to display the Login page for a specific organization with the Universal Login. By selecting "Prompt for Credentials ", the user will be prompted to select the Organization after authenticating based on the current connection. If "No Prompt" is selected, the application is responsible for sending the org identifier to the authorization server. If this step is skipped, Auth0 will display the Universal Login page setup for the application.
Set Up Management API Permissions
To retrieve and manage Organizations (Membership, Roles, Invitations), Enterprise Connections, you can utilize the Auth0 Management API. To call the Auth0 Management API endpoints, we need to separate our logic into a Service. This particular service needs to authenticate with a particular access token known as the Auth0 Management API token. These tokens are JSON Web Tokens (JWTs), which contain specific grant permissions, also known as scopes. Your application might require different permissions for performing multiple calls across different resources.
To get Management API Access Tokens for applications in a production environment, you first need to register a Machine-to-Machine (M2M) application in the Auth0 Dashboard. Your service will use these tokens for authentication purposes.
- To register an M2M application, navigate to the Applications view in the Auth0 Dashboard.
- Click "Create Application"
- Enter a name for your application: "My Learning M2M Service"
- Select "Machine to Machine Applications"
- Click "Create"
- In the next screen, select "Auth0 Management API"
- Select the following permissions:
- Read:
read:organizationsread:organization_connectionsread:organization_membersread:organization_member_rolesread:organization_invitationsread:usersread:connectionsread:roles
- Create:
create:organizationscreate:organization_connectionscreate:organization_memberscreate:organization_member_rolescreate:connectionscreate:organization_invitations
- Update:
update:users_app_metadata
- Delete:
delete:connectionsdelete:organization_invitationsdelete:organization_membersdelete:organization_member_roles
- Read:
- Click "Authorize" to complete the operation.
- Head back to the "Settings" tab of your Auth0 application page in the Auth0 Dashboard to get the value for
AUTH0_M2M_CLIENT_SECRET. - Locate the "Client Secret" field, copy its value, and paste it as the
AUTH0_M2M_CLIENT_SECRETenvironment value in the.env.localfile. - Populate the
.env.localwith the following environment variables:
AUTH0_M2M_CLIENT_ID=AUTH0_M2M_CLIENT_IDAUTH0_M2M_CLIENT_SECRET=AUTH0_M2M_CLIENT_SECRETAUTH0_M2M_SCOPES='read:organizations update:users_app_metadata read:connections read:roles create:organizations create:organization_connections create:organization_members create:organization_member_roles read:organization_connections create:connections delete:connections read:organization_members read:organization_member_roles read:organization_invitations create:organization_invitations delete:organization_invitations delete:organization_members delete:organization_member_roles read:users'
Create Roles
When users authenticate under the context of an organization in our sample application, they are expected to have either an "Employee" or "Administrator" role.
To create the Employee and Administrator roles, navigate to the "User Management" menu item in the Auth0 Dashboard, select the "Roles" option, and click "Create Role".
Enter the following information:
For Employee:
Employee
Employee Role
For Admnistrator:
Administrator
Administrator Role
Authentication
To authenticate users, Auth0 provides the database infrastructure to store your users by default. This sample application is expecting to use the default Auth0 "Username-Password-Authentication" connection and also "Google Social Login(google-oauth2"). Navigate to the My Learning SaaS application in the Auth0 Dashboard.
In the "Connections" tab, verify that these two connections are enabled and associated with the application. In this application, we provide a self-service dashboard that allows organization admin users to manage a connection to external IdPs to perform SSO (via Enterprise connections) and manage access to the application.
Extensibility with Auth0 Actions
Actions are secure, tenant-specific, versioned functions written in Node.js that execute at certain points within the Auth0 platform. You can use Actions to customize and extend Auth0's capabilities with custom logic, such as managing user and organization profile metadata.
Auth0 provides a comprehensive system for storing metadata in the Auth0 user profile. You can store the following information:
app_metadata:- Application-specific data, such as permissions, payment plans, and external IDs, can impact user access to features of your application.
- Users cannot edit this data.
user_metadata:- User-specific information, such as preferences, that do not impact the application's core functionality.
- Users can edit this data.
You can also extend Auth0 capabilities using organization metadata and expose that data to Actions. The Action event object stores contextual information about the current authentication transaction, such as the user's IP address, application, or location. In our example, when a user converts their trial into a business subscription, we used the Management SDK to update the MyLearning App user subscription plan on the user profile app_metada and to create the business subscription and store it in the Organization metadata. This way, all users of the Organization will belong to the same subscription plan.
As an Auth0 extensibility tool, Auth0 Actions allow you to customize the identity flow of your application without changing its code.
You can write an Auth0 action using custom code in Node.js that Auth0 triggers during specific events of the user authentication flow such as post-login, pre-user-registration, post-change-password, etc.
Create an Auth0 Action to Manage User Subscription
You will create a post-login event Action to create the subscription plan data and inject custom claims from the user application metadata into the ID or access token. These claims will be available for the application to consume as part of the user session.
To create the Auth0 Action to manage user subscriptions:
- Head to the Auth0 Dashboard and click on the "Actions" section on the left-hand navigation menu.
- Then, click on the "Flows" option under the "Actions" section.
- Flows represent a high-level operation within Auth0, like a User Login or Pre/Post User Registration.
- Select the "Login" flow.
- The flow editor opens up, where you can visualize the entire authentication flow for the login event. You can drag and drop your installed flows into the flow builder.
- Click the "+" button located in the top-right corner of the Flow editor and next to the "Add Action" label.
- Then, click the "Build Custom" option on the context menu that comes up.
- The "Browse Action" option takes you to the Auth0 Marketplace, where you can find Actions provided by third-party partners. You can explore that option later on.
- The "Create Action" modal comes up. Fill its form with the following information:
- Name:
Manage_Subscription - Trigger:
Login/Post Login - Runtime:
Node 18 (Recommended)
- Name:
- Click the "Create" button.
Now that you have created the skeleton of your Auth0 Login Action, you can access the Actions code editor, where you can customize the code, install libraries, and debug or troubleshoot your Action with mockup data.
The Actions Editor also allows you to view your Action's version history, save your Action code as a draft, or deploy it to make it available in your authentication flow.
You'll write code in this Action that fetches the user profile app_metadata or the Organization metadata depending on whether the user authenticates under the context of an organization or personal account. For new user accounts, we update the Auth0 user profile with information about the user subscription, such as a plan name representing a subscription tier (trial plan) and the plan end date and status. Finally, we enrich the user ID token with a custom claim containing the subscription data stored in the metadata.
When developing your own SaaS application, you could implement custom logic to get user data from your APIs or a payment processing or subscription management platform like Stripe.
Paste the following JavaScript code into the code editor:
/*** Handler that will be called during the execution of a PostLogin flow.** @param {Event} event - Details about the user and the context in which they are logging in.* @param {PostLoginAPI} api - Interface whose methods can be used to change the login behavior.*/exports.onExecutePostLogin = async (event, api) => {//#1 get user subscription from organization.metadata or user.app_metadatalet {plan_name, end_date, status} = (event.organization)? getSubscriptionPlan(event.organization.metadata) : getSubscriptionPlan(event.user.app_metadata);let subscription = plan_name + ';' + end_date + ';' + status;//#2 if no subscription is found, we have a new user. Set a trial plan with an expiration dateif (plan_name == null || end_date == null) {end_date = calculateTrialExpirationDate();subscription = 'trial' + ';' + end_date + ';' + 'active';api.user.setAppMetadata('subscription', subscription);}//#3 - set custom claim with plan name and expiration dateapi.idToken.setCustomClaim('subscription', subscription);};function getSubscriptionPlan(metadata) {let plan_name;let end_date;let status;if (metadata.subscription != null ) {const sub = metadata.subscription.split(";");plan_name = sub[0];end_date = new Date(sub[1]).toISOString();status = sub[2];}return {plan_name, end_date, status};}function calculateTrialExpirationDate() {const trialDays = 1;const startDate = new Date(Date.now());const endDate = new Date(startDate);endDate.setDate(startDate.getDate() + trialDays);return endDate.toISOString();}
You can then deploy your Action by clicking the "Deploy" button.
Now, follow these steps to integrate the Post-Login Action with your Login Flow:
- Head to the Login Flow panel by clicking the "Back to flow" button on the top-left corner.
- Click the "Custom" tab under the "Add Action" panel.
- Drag and drop the "Manage_Subscription" block between the "Start" and "Complete" event icons on the Flow board, which is located to the left.
- Click the "Apply" button to make this Login pipeline effective.
Create an Auth0 Action to set the Organization Member role
In addition to the post-login Action to manage the subscription plan, we will create another one to set the default user role for members of one organization authenticating with an External Identity Provider (set up via SSO). Upon the first login using the Federated connection, the Action will set the Employee role as the default Member role of the user.
Use the following information to create the new Action:
- Name:
Set_Default_Member_Role - Trigger:
Login/Post Login - Runtime:
Node 18 (Recommended)
Paste the following JavaScript code into the code editor:
/*** Handler that will be called during the execution of a PostLogin flow.** @param {Event} event - Details about the user and the context in which they are logging in.* @param {PostLoginAPI} api - Interface whose methods can be used to change the login behavior.*/exports.onExecutePostLogin = async (event, api) => {//user sign-in under the context of the organizationif (!event.organization) {return;}if (event.stats.logins_count !== 1) {return;}const ManagementClient = require('auth0').ManagementClient;const management = new ManagementClient({domain: event.secrets.domain,clientId: event.secrets.clientId,clientSecret: event.secrets.clientSecret,});const params = { id: event.organization.id, user_id : event.user.user_id};const data = { "roles" : ["ROLE_ID"]};try {//scope: create:organization_member_roles//Add user as Administrator of the organizationconst member_roles = await management.organizations.addMemberRoles(params,data);} catch (e) {console.log(e)// Handle error}};
In this particular scenario, the Action uses the Management API to assign roles to a member of the organization. Replace the ROLE_ID String with the Role Id of the Employee role you previously created.
To use the Management API in the Action, you will need to:
-
Create a Machine-to-Machine Application.
- Navigate to "Auth0 Dashboard" > "Applications" > "Applications" and click on Create Application.
- Enter a name for the application, e.g.,
Actions Management API Client. - Choose the application type "Machine to Machine Applications".
- Click on the "Create" button.
-
Authorize the application to access the Management API with specific scopes.
- On the next page, select "Auth0 Management API".
- Select the following permissions
create:organization_member_roles. - Click on "Authorize".
-
Store the application's credentials in the
event.secretsobject in the Auth0 Action.- Select the key icon from the code editor's left sidebar.
- Select "Add Secret".
- Create the following secrets:
domain: the domain name of your Auth0 tenant - you can use the domain value specified in the environment variableAUTH0_ISSUER_BASE_URLdefined in the.env.localfile.clientId: the client ID of the Machine to Machine applicationclientSecret: the client secret of the Machine-to-Machine application
-
Add the auth0 npm package as a dependency.
- Select the Dependency icon (cube icon) in the sidebar.
- Enter the name:
auth0 - Set a version:
3.7.1 - Click "Create".
-
Save the Draft
You can then deploy your Action by clicking the "Deploy" button.
Now, follow these steps to integrate the Post-Login Action with your Login Flow:
- Navigate to the Login Flow panel by clicking the "Back to flow" button on the top-left corner.
- Click the "Custom" tab under the "Add Action" panel.
- Drag and drop the "Set_Default_Member_Role" block to execute after the
Manage_Subscriptionflow. - Click the "Apply" button to make this Login pipeline effective.
You are now ready to test the application.
Run the Next.js Code Sample
Execute the following command to run the Next.js web application:
npm run dev
Use the Next.js Sample Application
To access the application, you can now visit http://localhost:3000/.
When you click on the "Start Free Trial" button, Next.js takes you to the Auth0 Universal Login page. Your users can sign up for your application through a page hosted by Auth0, which provides them with a secure, standards-based login experience that you can customize with your branding and various authentication methods, such as logging in with a username and password or with a social provider like Facebook or Google. You can customize the Auth0 Universal Login page with the no-code editor.
Once you log in, visit the protected "Profile" page to see all the user profile information that Auth0 securely shares with your application using ID tokens:
You can test that the protected Next.js routes require users to log in before accessing them. Click on the "Log Out" button and try to access the Home page, Profile page, or the Admin page:
If everything works as expected, Next.js redirects you to log in with Auth0.
Testing the User Subscription Action
You can notice upon signing up and first logging in that the user has been automatically enrolled in a Trial subscription plan with one day left before the plan expires. This information was defined by the Manage_Subscription Action you previously created and deployed.
When opening the Profile page, notice a custom claim is included in the ID token and available through the user session - subscription. This custom claim manages the subscription state and displays the plan information through the expiration bar. All this information comes from the metadata in the user profile or the user's organization. We extended the capability of the application without changing the application's code.
Navigate to the "Auth0 Dashboard" > "User Management" > "Users". Then, click on the user you created. In the app_metadata section of the user profile, you should have the following attributes stored with similar data:
{"subscription": "trial;2024-09-17T23:58:28.392Z;active"}
Testing the End User Conversion flow (Trial to Business)
End users can convert their Trial accounts into Personal, Team, or Enterprise accounts. The end user subscription plan is initially stored in the app_metadata described above. By subscribing to a Team or Enterprise plan, the end-user needs to go through the flow of creating a new Organization. Each organization is associated with the Auth0 Database Connection and Google Social Login connection.
However, after the initial registration, businesses want to allow employees to sign in to the application using their Company Identity Provider. The MyLearning SaaS application follows this flow by providing a self-service Admin dashboard to allow businesses to include an external IdP connection to allow users to SSO to the application using their enterprise accounts.
For security reasons, users can only authenticate with the organizations they belong to as members. Once authenticated with an organization, the org_id is added to the ID token.
Follow these steps to convert the end-user plan from a Trial plan to a Team/Enterprise one:
- Sign in to My Learning.
- At the top of the Home page, click on the link in the notification/status bar. You should see the message You have one day(s) left on your trial subscription. Click here to subscribe to a plan.
- Click on either "Team" or "Enterprise" plan.
- On the payment page, click "Confirm".
- On the confirmation page, you need to enter a name for your organization. For example,
mycompany. That's a unique logical identifier that follows this naming pattern:- It may contain lowercase alphabetical characters, numbers, underscores (
_), and dashes (-). - It can start with a number.
- It must be between 3 and 50 characters.
- It may contain lowercase alphabetical characters, numbers, underscores (
- Click "Confirm" to complete the operation. At this point, the user will be re-authenticated under the organization's context and redirected to the Home page.
- Click the User Profile tab and observe the user profile now contains the updated subscription details and also provides the
org_idto identify the user is authenticated under the context of the organization.
{"subscription": "enterprise;2024-09-17T23:58:28.392Z;active"..."org_id": "org_aqC7DB4k5NgK4RHv"}
- Navigate to "Auth0 Dashboard" > "Organizations". Then, click the name of the Auth0 Organization you created. Expand the
metadatasection of the organization. You should have thesubscriptionkey stored with similar data:
{"enterprise;2024-09-17T23:58:28.392Z;active"}
Configure Identifier First Authentication
We want to offer end users a customized user experience depending on the identifier they entered. With the Identifier First flow, users are prompted for their identifier and authentication method in two separate steps. In the first step, the end user will enter the username/e-mail. After that, they will be redirected to enter their password or to continue with the authentication flow on their organization's Identity Provider page.
To configure the Identifier first:
- Navigate to "Auth0 Dashboard" > "Authentication" > "Authentication Profile".
- Select "Identifier First" or "Identifier First + Biometrics".
- Click "Save".
- Click the "Try" button to check the user experience with different options.
Single Sign-On (SSO): External Identity Provider
Pre-requisites
- External OIDC Identity Provider
This sample application provides a self-service dashboard to allow organization administrators to create "SSO Connections" (Enterprise Connections), which enables business users to authenticate through their organizations using their enterprise identities.
These connections can be created through the Auth0 Dashboard or the Management SDK. For testing this use case, we will use Okta Workforce Identity Cloud. If you don't have one account, you can sign up for an Okta Workforce Identity Cloud developer account here. Let's create an App Integration.
- Open the Admin Dashboard in the Okta Workforce Identity Cloud.
- Navigate to "Applications" > "Application".
- Click "Create App Integration"
- When prompted to select a "Sign-in method", select "OIDC - OpenID Connect" application.
- Then in the "Application type" section, select "Web Application" and then click "Next".
- In the New Web App Integration page, enter an App integration name,
My Learning SaaS. - In the "Sign-in redirect URIs" section, click Add URI and enter the callback URL of your Auth0 tenant. You can get the URL of the Authorization server issuer directly in the
.env.localfile you created under theAUTH0_ISSUER_BASE_URLvariable. Add the callback path to complete the URL:/login/callback. You should have something like the following URL at the endhttps://{my-tenant-name}.{region prefix}.auth0.com/login/callback. - In the Assignments section, select "Allow everyone in your organization to access". Alternatively, you can create a group ("Directory" > "Groups") and select "Limit access to selected groups " and enter the group you created.
- Click on "Save".
- Take notes on the "Client ID" and "Client Secret" values, as we will use them soon.
- To create the new OIDC connection in the
My Learning SaaS application, you must provide the external IdP authorization server discovery endpoint. To get the discovery endpoint in the Okta Worforce Identity Cloud account, you need to find your account's domain name. - Click the drop-down arrow beside your username at the top right corner of the Admin dashboard page. A pop-up will be displayed. Copy the domain name which is available under your username.
- The following discovery endpoint should be used for OpenID
https://{okta-worforce-identity-cloud-domain}/.well-known/openid-configurationas described here. - Create a new User following the instructions in the Okta Workforce Identity Cloud documentation
Next, we will create the SSO connection for the My Learning SaaS application.
- Navigate to the application:
http://localhost:3000/home - Click on "Settings" > "SSO".
- Add a new "OpenID Connect" connection.
- Fill out the form with the data from the external Identity Provider you created in the Okta Workforce and click "Create" to save the new OIDC connection.
You can also add/modify the connection settings directly from the Auth0 dashboard. Navigate to "Dashboard" > "Authentication" > "Enterprise" > "OpenID Connect". Then, click the connection you created.
Sign out from the My Learning SaaS app and sign back in with a user created in the external Identity Provider. You will be redirected to the Okta Worforce Identity Cloud connection you created.
Invite users to the organization
Your end user successfully subscribed to a new plan and is authenticated under the context of an organization. Now, it is time to invite new users to become members of this organization. In this case, the invited user will receive an email containing a link that will allow them to create an account or log in and join the organization, optionally with predefined roles, and be redirected to your application so that they can immediately start using it.
Follow the steps provided in the documentation to set up your Application/Tenant - Login URI. The sample application Login URI should be similar to: https://[my-app-domain]/api/auth/login.
Then, you can navigate to My Learning application > "Settings" > "Members" > "Add Member". Enter the email, Access Level (role), and select the connection the user should authenticate. The invited user should accept the invitation and sign in to the application to become a member of the organization.
