This Laravel guide will help you learn how to secure a Laravel web application using token-based authentication. You'll learn how to integrate Auth0 with Larave to implement the following security features:
- How to add user login, sign-up, and logout to Laravel web applications.
- How to create route guards to protect Laravel web application routes.
- How to get user profile information to personalize a Laravel user interface.
- How to make API calls from a Laravel web app to request data from an external protected API.
This guide uses the Auth0 PHP SDK, which provides developers with a high-level API to handle many authentication implementation details. You can secure your Laravel applications following security best practices while writing less code.
Project Requirements
Ensure that you have the following tools installed in your system:
- PHP
8.2+ - Composer
v2.6+ - Docker Desktop
v4.20+(Required only when using local docker environment)
Quick Laravel Setup
With the help of Auth0, you don't need to be an expert on identity protocols, such as OAuth 2.0 or OpenID Connect, to understand how to secure your web application stack.
You first integrate your Laravel web application with Auth0. Your application will then redirect users to an Auth0 customizable login page when they need to log in. Once your users log in successfully, Auth0 redirects them back to your Laravel web app, returning an ID Token with their authentication and user information.
Get the Starter Application
Clone the starter repository on its starter branch to get started:
git clone https://github.com/auth0-developer-hub/web-app_laravel_php_hello-world.git --branch starter --single-branch
Once you clone the repo, make web-app_laravel_php_hello-world your current directory:
cd web-app_laravel_php_hello-world
Install the project dependencies:
composer install
Configure the Application
Create a .env file under the project directory:
Open the .env file under your project directory and update it as follows:
APP_NAME=Auth0_LaravelAPP_ENV=localAPP_DEBUG=trueAPP_URL=http://localhost:4040APP_KEY=APP_PORT=4040
Next, you need to generate the APP_KEY for your application. Run the following command to generate it:
php artisan key:generate
This will populate the APP_KEY environment variable on your .env file with a valid random key.
Run the Project
Execute the following command to run the web server locally:
php artisan serve --port 4040
Navigate to http://localhost:4040 to verify that everything is working as expected. You should see the web app homepage up and running.
Run the Project In Docker
Laravel Sail provides a light-weight command line interface to interact with a Docker environment. Using Sail, we don't have to build a complete local Docker environment from scratch. By default, Laravel comes with Sail in its composer dev requirements. Learn more about Sail.
You've already configured Sail for the starter project. Make sure the Docker engine is running on your machine, then run the following command to start the application:
php artisan up -d
Configure Laravel with Auth0
Follow these steps to get started with the Auth0 Identity Platform quickly:
Sign up and create an Auth0 Application
A free account also offers you:
- Auth0 Universal Login for Web, iOS & Android.
- Up to 2 social identity providers like Google, GitHub, and Twitter.
- Up to 3 Actions, Rules, & Hooks to customize and extend Auth0's capabilities.
During the sign-up process, you create something called an Auth0 Tenant, representing the product or service to which you are adding authentication.
Once you sign in, Auth0 takes you to the Dashboard. In the left sidebar menu, click on "Applications".
Then, click the "Create Application" button. A modal opens up with a form to provide a name for the application and choose its type. Use the following values:
Auth0 Laravel Web App Code Sample


Click the "Create" button to complete the process. Your Auth0 application page loads up.
In the next step, you'll learn how to help your Laravel application and Auth0 communicate.
What's the relationship between Auth0 Tenants and Auth0 Applications?
Let's say that you have a photo-sharing Laravel app called "Photogram". You then would create an Auth0 tenant called Photogram. From a customer perspective, Photogram is that customer's product or service.
Now, say that Photogram is available on three platforms: web as a single-page application and Android and iOS as a native mobile application. If each platform needs authentication, you need to create three Auth0 applications to provide the product with everything it needs to authenticate users through that platform.
Photogram users belong to the Auth0 Photogram tenant, which shares them across its Auth0 applications.
Create a communication bridge between Laravel and Auth0
When using the Auth0 Identity Platform, you don't have to build login forms. Auth0 offers a Universal Login Page to reduce the overhead of adding and managing authentication.
How does Universal Login work?
Your Laravel web application will redirect users to Auth0 whenever they trigger an authentication request. Auth0 will present them with a login page. Once they log in, Auth0 will redirect them back to your Laravel web application. For that redirecting to happen securely, you must specify in your Auth0 Application Settings the URLs to which Auth0 can redirect users once it authenticates them.
As such, click on the "Settings" tab of your Auth0 Application page, locate the "Application URIs" section, and fill in the following values:
http://localhost:4040/callback
The above value is the URL that Auth0 can use to redirect your users after they successfully log in.
http://localhost:4040
The above value is the URL that Auth0 can use to redirect your users after they log out.
http://localhost:4040
Using the Auth0 PHP SDK, your Laravel web application will make requests under the hood to an Auth0 URL to handle authentication requests. As such, you need to add your Laravel web application origin URL to avoid Cross-Origin Resource Sharing (CORS) issues.
Scroll down and click the "Save Changes" button.
Add the Auth0 configuration variables to Laravel
From the Auth0 Application Settings page, you need the Auth0 Domain, Client ID, and Client Secret values to allow your Laravel web application to use the communication bridge you created.
What exactly is an Auth0 Domain, an Auth0 Client ID, and an Auth0 Client Secret?
Domain
When you created a new Auth0 account, Auth0 asked you to pick a name for your Tenant. This name, appended with auth0.com, is your Auth0 Domain. It allows you to build the URL that you will use to access the Auth0 APIs and the URL where you'll redirect users to log in.
Client ID
Each application is assigned a Client ID upon creation, which is an alphanumeric string, and it's the unique identifier for your application (such as q8fij2iug0CmgPLfTfG1tZGdTQyGaTUA). You cannot modify the Client ID. You will use the Client ID to identify the Auth0 Application to which the Auth0 PHP SDK needs to connect.
Client Secret
This secret protects your resources by only granting tokens to requestors if they're authorized. Think of it as your application's password, which must be kept confidential at all times. If anyone gains access to your Client Secret, they can impersonate your application and access protected resources.
Head back to your Auth0 application page and click on the "Settings" tab.
Locate the "Basic Information" section and follow these steps to get the Auth0 Domain, Auth0 Client ID, and Auth0 Client Secret values:
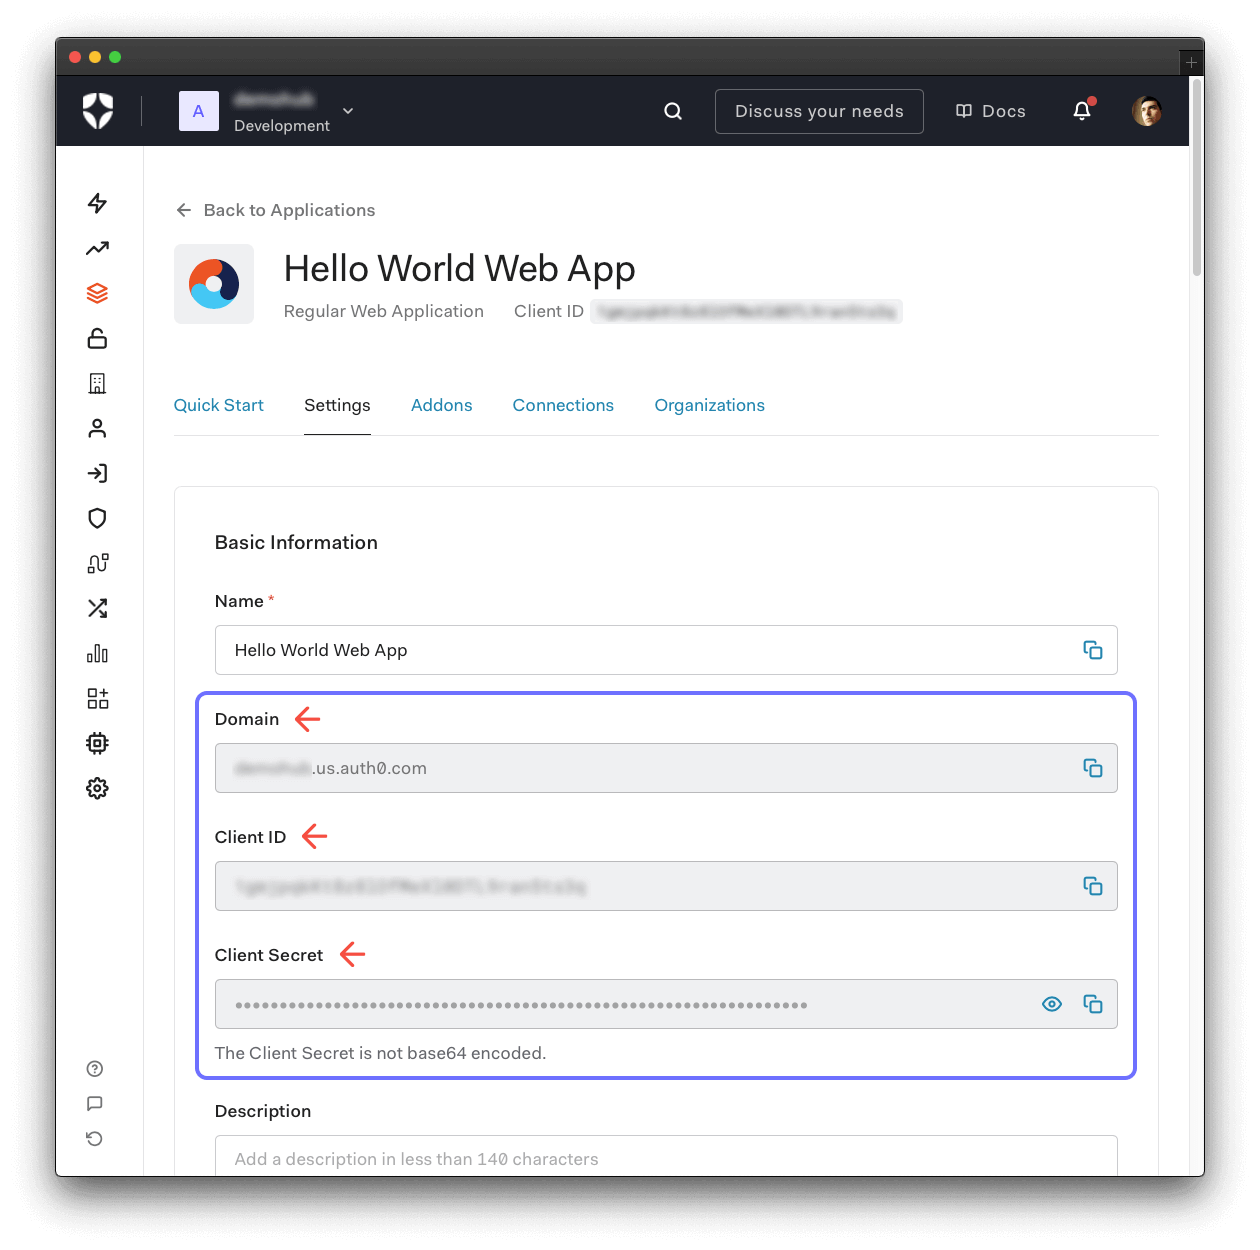
These variables let your Laravel web application identify itself as an authorized party to interact with the Auth0 authentication server.
When you enter a value in the input fields present on this page, any code snippet that uses such value updates to reflect it. Using the input fields makes it easy to copy and paste code as you follow along.
As such, enter the "Domain" and "Client ID" values in the following fields to set up your web application in the next section:
Now, update the .env file under the Laravel project directory as follows:
APP_NAME=Auth0_LaravelAPP_ENV=localAPP_DEBUG=trueAPP_URL=http://localhost:4040APP_KEY=APP_PORT=4040AUTH0_DOMAIN=AUTH0-DOMAINAUTH0_CLIENT_ID=AUTH0-CLIENT-IDAUTH0_CLIENT_SECRET=AUTH0-CLIENT-SECRET
Head back to the "Settings" tab of your Auth0 application page in the Auth0 Dashboard to get the value for AUTH0_CLIENT_SECRET.
Locate the "Client Secret" field, copy its value, and paste it as the AUTH0_CLIENT_SECRET environment value in the .env file.
Set up Auth0 PHP SDK
You'll use an Auth0 authentication service to enable authentication on your endpoints.
First, install the Auth0 PHP SDK:
composer require auth0/auth0-php
Then, create a config file in order to be able to set the Auth0 service:
touch config/auth0.php
and populate it as follows:
<?phpreturn ['domain' => env('AUTH0_DOMAIN'),'clientId' => env('AUTH0_CLIENT_ID'),'clientSecret' => env('AUTH0_CLIENT_SECRET'),'cookieSecret' => env('APP_KEY')];
This config file can also be used to set any accepted configuration option from the Auth0 class constructor.
Now, open the app/Providers/AuthServiceProvider.php file to make the Auth0 service available to the application, as well as set up an authentication driver that will use the credentials returned by the Auth0 service to create a user. Laravel provides a GenericUser class that we will use to transform the credentials returned by Auth0 into an object that Laravel can use for authentication:
<?phpnamespace App\Providers;use Auth0\SDK\Auth0;use Auth0\SDK\Configuration\SdkConfiguration;use Illuminate\Auth\GenericUser;use Illuminate\Foundation\Support\Providers\AuthServiceProvider as ServiceProvider;use Illuminate\Support\Facades\Auth;class AuthServiceProvider extends ServiceProvider{/*** The model to policy mappings for the application.** @var array<class-string, class-string>*/protected $policies = [//];public function register(){$this->app->singleton(Auth0::class, function () {$config = array_merge(config('auth0'), ['strategy' => 'webapp',]);$configuration = new SdkConfiguration($config);return new Auth0($configuration);});}/*** Register any authentication / authorization services.*/public function boot(): void{Auth::viaRequest('auth0', function () {/**@var Auth0 $auth0*/$auth0 = app(Auth0::class);$credentials = $auth0->getCredentials();if (empty($credentials)) {return null;}return new GenericUser($credentials->user);});}}
Next, you need to update the default driver for your application. Open the config/auth.php file and update it as follows:
<?phpreturn [/*|--------------------------------------------------------------------------| Authentication Defaults|--------------------------------------------------------------------------|| This option controls the default authentication "guard" and password| reset options for your application. You may change these defaults| as required, but they're a perfect start for most applications.|*/'defaults' => ['guard' => 'web','passwords' => 'users',],/*|--------------------------------------------------------------------------| Authentication Guards|--------------------------------------------------------------------------|| Next, you may define every authentication guard for your application.| Of course, a great default configuration has been defined for you| here which uses session storage and the Eloquent user provider.|| All authentication drivers have a user provider. This defines how the| users are actually retrieved out of your database or other storage| mechanisms used by this application to persist your user's data.|| Supported: "session"|*/'guards' => ['web' => ['driver' => 'auth0','provider' => 'users',],],/*|--------------------------------------------------------------------------| User Providers|--------------------------------------------------------------------------|| All authentication drivers have a user provider. This defines how the| users are actually retrieved out of your database or other storage| mechanisms used by this application to persist your user's data.|| If you have multiple user tables or models you may configure multiple| sources which represent each model / table. These sources may then| be assigned to any extra authentication guards you have defined.|| Supported: "database", "eloquent"|*/'providers' => ['users' => ['driver' => 'eloquent','model' => App\Models\User::class,],// 'users' => [// 'driver' => 'database',// 'table' => 'users',// ],],/*|--------------------------------------------------------------------------| Resetting Passwords|--------------------------------------------------------------------------|| You may specify multiple password reset configurations if you have more| than one user table or model in the application and you want to have| separate password reset settings based on the specific user types.|| The expiry time is the number of minutes that each reset token will be| considered valid. This security feature keeps tokens short-lived so| they have less time to be guessed. You may change this as needed.|| The throttle setting is the number of seconds a user must wait before| generating more password reset tokens. This prevents the user from| quickly generating a very large amount of password reset tokens.|*/'passwords' => ['users' => ['provider' => 'users','table' => 'password_reset_tokens','expire' => 60,'throttle' => 60,],],/*|--------------------------------------------------------------------------| Password Confirmation Timeout|--------------------------------------------------------------------------|| Here you may define the amount of seconds before a password confirmation| times out and the user is prompted to re-enter their password via the| confirmation screen. By default, the timeout lasts for three hours.|*/'password_timeout' => 10800,];
Add User Login to Laravel
You need to create a button that takes the user from your Laravel application to the Auth0 login page. To start, let's create an AuthController to handle all the authentication actions by running the following command:
php artisan make:controller AuthController
Next, populate it with the following content:
<?phpnamespace App\Http\Controllers;use Auth0\SDK\Auth0;use Illuminate\Contracts\Foundation\Application;use Illuminate\Http\RedirectResponse;use Illuminate\Routing\Redirector;class AuthController{public function login(Auth0 $auth0): Redirector|RedirectResponse|Application{return redirect($auth0->login(route('callback')));}public function callback(Auth0 $auth0): Redirector|RedirectResponse|Application{try {$auth0->exchange(route('profile'));} catch (\Exception $ex) {logger($ex->getMessage(), [$ex]);$auth0->clear();}return redirect(route('profile'));}}
The actions of this controller serve as wrappers for the Auth0 service. Notice we added the callback action since it is needed to handle the response in the app after the user gets redirected back to the app. This callback will redirect the user to their profile page if the login is successful or display an error if the login fails.
Next, update your routes/web.php file to include the corresponding route for the login action of this controller:
<?phpuse App\Http\Controllers\AuthController;use App\Http\Controllers\MessageController;use App\Http\Controllers\ProfileController;use Illuminate\Support\Facades\Route;/*|--------------------------------------------------------------------------| Web Routes|--------------------------------------------------------------------------|| Here is where you can register web routes for your application. These| routes are loaded by the RouteServiceProvider and all of them will| be assigned to the "web" middleware group. Make something great!|*/Route::get('/', function () {return view('pages.home');})->name('home');Route::get('/profile', [ProfileController::class, 'index'])->name('profile');Route::get('/public', [MessageController::class, 'publicMessage'])->name('public');Route::get('/protected', [MessageController::class, 'protectedMessage'])->name('protected');Route::get('/admin', [MessageController::class, 'adminMessage'])->name('admin');Route::get('/login', [AuthController::class, 'login'])->name('login');Route::get('/callback', [AuthController::class, 'callback'])->name('callback');Route::any('/{uri}', function () {return view('pages.error', ['error' => 'Not Found']);})->where('uri', '.+')->name('not-found');
Notice we also added the callback route here to correctly map it to the corresponding AuthController action handler.
Add the Login Button view
You'll define user-interface elements using view components. View components allow us to create modular and reusable templates that allow developers to emulate a component-like architecture in Laravel web applications. Instead of writing this template structure over and over in your code, you can simply use custom tags whenever you need its presentation and functionality.
Each view component is composed of 2 files:
- The component class that is responsible for any processing and return the correct view;
- The component view that is responsible for the presentation layer of the component;
Laravel provides a make:component command to create those two files.
First, create the LoginButton files by running the following command:
php artisan make:component LoginButton
Then, populate the view file as follows:
<a class="button__login" href="{{ route('login') }}">Log In</a>
Notice that the route parameter is the same name that was used in your routes to map the action to a route.
Add Sign-Up to Laravel
Update the AuthController to include the Sign-Up action handler:
<?phpnamespace App\Http\Controllers;use Auth0\SDK\Auth0;use Illuminate\Contracts\Foundation\Application;use Illuminate\Http\RedirectResponse;use Illuminate\Routing\Redirector;class AuthController{public function login(Auth0 $auth0): Redirector|RedirectResponse|Application{return redirect($auth0->login(route('callback')));}public function signup(Auth0 $auth0): Redirector|RedirectResponse|Application{return redirect($auth0->signup(route('callback')));}public function callback(Auth0 $auth0): Redirector|RedirectResponse|Application{try {$auth0->exchange(route('profile'));} catch (\Exception $ex) {logger($ex->getMessage(), [$ex]);$auth0->clear();}return redirect(route('profile'));}}
Next, update your routes/web.php file to include the corresponding route for the Sign-Up action of this controller:
<?phpuse App\Http\Controllers\AuthController;use App\Http\Controllers\MessageController;use App\Http\Controllers\ProfileController;use Illuminate\Support\Facades\Route;/*|--------------------------------------------------------------------------| Web Routes|--------------------------------------------------------------------------|| Here is where you can register web routes for your application. These| routes are loaded by the RouteServiceProvider and all of them will| be assigned to the "web" middleware group. Make something great!|*/Route::get('/', function () {return view('pages.home');})->name('home');Route::get('/profile', [ProfileController::class, 'index'])->name('profile');Route::get('/public', [MessageController::class, 'publicMessage'])->name('public');Route::get('/protected', [MessageController::class, 'protectedMessage'])->name('protected');Route::get('/admin', [MessageController::class, 'adminMessage'])->name('admin');Route::get('/login', [AuthController::class, 'login'])->name('login');Route::get('/callback', [AuthController::class, 'callback'])->name('callback');Route::get('/signup', [AuthController::class, 'signup'])->name('signup');Route::any('/{uri}', function () {return view('pages.error', ['error' => 'Not Found']);})->where('uri', '.+')->name('not-found');
Create the SignupButton component:
php artisan make:component SignupButton
And populate the view file as follows:
<a class="button__sign-up" href="{{ route('signup') }}">Sign Up</a>
Add Logout to Laravel
Update the AuthController to include the Logout action handler:
<?phpnamespace App\Http\Controllers;use Auth0\SDK\Auth0;use Illuminate\Contracts\Foundation\Application;use Illuminate\Http\RedirectResponse;use Illuminate\Routing\Redirector;class AuthController{public function login(Auth0 $auth0): Redirector|RedirectResponse|Application{return redirect($auth0->login(route('callback')));}public function logout(Auth0 $auth0): Redirector|RedirectResponse|Application{return redirect($auth0->logout(route('home')));}public function signup(Auth0 $auth0): Redirector|RedirectResponse|Application{return redirect($auth0->signup(route('callback')));}public function callback(Auth0 $auth0): Redirector|RedirectResponse|Application{try {$auth0->exchange(route('profile'));} catch (\Exception $ex) {logger($ex->getMessage(), [$ex]);$auth0->clear();}return redirect(route('profile'));}}
Next, update your routes/web.php file to include the corresponding route for the Logout action of this controller:
<?phpuse App\Http\Controllers\AuthController;use App\Http\Controllers\MessageController;use App\Http\Controllers\ProfileController;use Illuminate\Support\Facades\Route;/*|--------------------------------------------------------------------------| Web Routes|--------------------------------------------------------------------------|| Here is where you can register web routes for your application. These| routes are loaded by the RouteServiceProvider and all of them will| be assigned to the "web" middleware group. Make something great!|*/Route::get('/', function () {return view('pages.home');})->name('home');Route::get('/profile', [ProfileController::class, 'index'])->name('profile');Route::get('/public', [MessageController::class, 'publicMessage'])->name('public');Route::get('/protected', [MessageController::class, 'protectedMessage'])->name('protected');Route::get('/admin', [MessageController::class, 'adminMessage'])->name('admin');Route::get('/login', [AuthController::class, 'login'])->name('login');Route::get('/logout', [AuthController::class, 'logout'])->name('logout');Route::get('/callback', [AuthController::class, 'callback'])->name('callback');Route::get('/signup', [AuthController::class, 'signup'])->name('signup');Route::any('/{uri}', function () {return view('pages.error', ['error' => 'Not Found']);})->where('uri', '.+')->name('not-found');
Create LogoutButton component:
php artisan make:component LogoutButton
Then populate the view file as follows:
<a class="button__logout" href="{{ route('logout') }}">Log Out</a>
Render Content Based on Authentication
A good place to provide login, logout, and sign-up functionality to the application would be in the navigation bar. There are two of them: one for desktop and one for mobile.
The application should render a login and sign-up button to any visitor who has not authenticated. After users authenticate in the application, either by logging in or signing up, they should see a logout button.
Hence, you need to share the user's authentication state with your templates. For this, we will make use of the powerful Laravel View Composers. Let's see how we can do that in the Laravel application.
First, you need to make the authentication state available to all views. Update the app/Providers/AppServiceProvider.php file as follows:
<?phpnamespace App\Providers;use App\Services\MessageService;use App\Services\MessageServiceInterface;use Illuminate\Support\Facades\View;use Illuminate\Support\ServiceProvider;use Illuminate\View\View as ViewObject;class AppServiceProvider extends ServiceProvider{/*** Register any application services.*/public function register(): void{$this->app->singleton(MessageServiceInterface::class, MessageService::class);}/*** Bootstrap any application services.*/public function boot(): void{View::composer('*', function (ViewObject $view) {$view->with('isAuthenticated', !auth()->guest());});}}
Next, create a component to toggle the visible buttons on the navbar. If the user is authenticated, they should see the "Logout" button. If a guest user, they should see the "Sign-up" and the "Login" button.
First create a component to hold the authentication buttons:
php artisan make:component AuthenticationButtons
And, as before, populate the view it as follows:
@if (!isset($isAuthenticated) || !$isAuthenticated)<x-signup-button /><x-login-button />@else<x-logout-button />@endif
The last step is to update the navbar view files to reflect the authentication state using the AuthenticationButtons component. Open the resources/views/components/nav-bar.blade.php and update it as follows:
<div class="nav-bar__container"><nav class="nav-bar"><div class="nav-bar__brand"><a href="{{ route('home', [], false) }}"><img class="nav-bar__logo" src="https://cdn.auth0.com/blog/hub/code-samples/hello-world/auth0-logo.svg" alt="Auth0 shield logo" width="122" height="36" /></a></div><div class="nav-bar__tabs"><a href="{{ route('profile', [], false) }}" class="nav-bar__tab">Profile</a><a href="{{ route('public', [], false) }}" class="nav-bar__tab">Public</a>@if (isset($isAuthenticated) && $isAuthenticated)<a href="{{ route('protected', [], false) }}" class="nav-bar__tab">Protected</a><a href="{{ route('admin', [], false) }}" class="nav-bar__tab">Admin</a>@endif</div><div class="nav-bar__buttons"><x-authentication-buttons /></div></nav></div>
You also need to update the mobile navigation bar. Open the resources/views/components/mobile-nav-bar.blade.php
<div class="mobile-nav-bar__container"><nav id="mobile-nav-bar" class="mobile-nav-bar"><div class="mobile-nav-bar__brand"><a href="{{ route('home', [], false) }}"><img class="mobile-nav-bar__logo" src="https://cdn.auth0.com/blog/hub/code-samples/hello-world/auth0-logo.svg" alt="Auth0 shield logo" width="82" height="24" /></a></div><span class="mobile-nav-bar__toggle material-icons" id="mobile-menu-toggle-button">menu</span><div class="mobile-nav-bar__menu mobile-nav-bar__menu--closed" id="mobile-menu"><div class="mobile-nav-bar__tabs"><a href="{{ route('profile', [], false) }}" class="mobile-nav-bar__tab">Profile</a><a href="{{ route('public', [], false) }}" class="mobile-nav-bar__tab">Public</a>@if (isset($isAuthenticated) && $isAuthenticated)<a href="{{ route('protected', [], false) }}" class="mobile-nav-bar__tab">Protected</a><a href="{{ route('admin', [], false) }}" class="mobile-nav-bar__tab">Admin</a>@endif</div><div class="mobile-nav-bar__buttons"><x-authentication-buttons /></div></div></nav></div>
Protect Access to Laravel Routes
To allow only authenticated users to access the endpoints, add the authentication middleware on the GET /protected, GET /admin, and GET /profile endpoints. Open the routes/web.php file and update it as follows:
<?phpuse App\Http\Controllers\AuthController;use App\Http\Controllers\MessageController;use App\Http\Controllers\ProfileController;use Illuminate\Support\Facades\Route;/*|--------------------------------------------------------------------------| Web Routes|--------------------------------------------------------------------------|| Here is where you can register web routes for your application. These| routes are loaded by the RouteServiceProvider within a group which| contains the "web" middleware group. Now create something great!|*/Route::get('/', function () {return view('pages.home');})->name('home');Route::get('/profile', [ProfileController::class, 'index'])->middleware(['auth'])->name('profile');Route::get('/public', [MessageController::class, 'publicMessage'])->name('public');Route::get('/protected', [MessageController::class, 'protectedMessage'])->middleware(['auth'])->name('protected');Route::get('/admin', [MessageController::class, 'adminMessage'])->middleware(['auth'])->name('admin');Route::get('/login', [AuthController::class, 'login'])->name('login');Route::get('/logout', [AuthController::class, 'logout'])->name('logout');Route::get('/callback', [AuthController::class, 'callback'])->name('callback');Route::get('/signup', [AuthController::class, 'signup'])->name('signup');Route::any('/{uri}', function () {return view('pages.error', ['error' => 'Not Found']);})->where('uri', '.+')->name('not-found');
Get User Profile Information in Laravel
You should update the app/Http/Controllers/ProfileController.php file to replace the placeholder information with the user information that Auth0 returns:
<?phpnamespace App\Http\Controllers;use Illuminate\Contracts\Foundation\Application;use Illuminate\Contracts\View\Factory;use Illuminate\Contracts\View\View;class ProfileController extends Controller{public function index(): View|Application|Factory{$user = auth()->user();$userAttributes = array_values((array) $user)[0];return view('pages.profile', ['user' => $user,'code' => json_encode($userAttributes,\JSON_PRETTY_PRINT | \JSON_UNESCAPED_UNICODE | \JSON_UNESCAPED_SLASHES)]);}}
Lastly, update the resources/views/pages/profile.blade.php file to use the user instead of the placeholder information:
@extends('layout')@section('content')<div class="content-layout"><h1 id="page-title" class="content__title">Profile Page</h1><div class="content__body"><p id="page-description"><span>You can use the <strong>ID Token</strong> to get the profile information of an authenticated user.</span><span><strong>Only authenticated users can access this page.</strong></span></p><div class="profile-grid"><div class="profile__header"><img src="{{ $user->picture }}" alt="Profile" class="profile__avatar" /><div class="profile__headline"><h2 class="profile__title">{{ $user->name }}</h2><span class="profile__description">{{ $user->email }}</span></div></div><div class="profile__details"><x-code-snippet title="Decoded ID Token" code='{!! $code !!}' /></div></div></div></div>@endsection
Go ahead and try to log in using the "Login" button. Your Laravel application redirects you to the Auth0 Universal Login page. You can use a form to log in with a username and password or a social identity provider like Google. Notice that this login page should also give you the option to sign up.
After you enter your credentials and log in successfully, you should end up on the /profile page.
Once there, click on the "Log Out" button. Laravel should redirect you to the home page, /.

Integrate Laravel with a Protected API Server
When we use Auth0, we delegate the authentication process to a centralized service. Auth0 provides us with functionality to log in and log out users from the web application. However, the application may need to access protected resources from an API.
The web application authenticates the user and receives an access token from Auth0. The application can then pass that access token to the API as a credential. In turn, the API can use Auth0 libraries to verify the access token it receives from the calling application and issue a response with the desired data.
How can you make secure API calls from a Laravel Web App?
Instead of creating an API from scratch to test the authentication and authorization flow between the client and the server, you can pair this client application with an API server that matches the technology stack you use at work. The Laravel "Hello World" client application that you have been building up can interact with any of the "Hello World" API server samples from the Auth0 Developer Center.
Pick an API code sample in your preferred backend framework and language from the list below and follow the instructions on the code sample page to set it up. Once you complete the sample API server setup, please return to this page to learn how to integrate that API server with your Laravel web application.
Call a protected API from Laravel
The way that the Auth0 service is configured on the basic-authentication branch only returns opaque access tokens. This means that those tokens don't have any claim. Since those claims are needed to authorize the calls on the backend API server, you need to configure the Auth0 service in a way that Auth0's authorization server will return a JWT access token instead of an opaque one. To change that, just include the audience configuration on your service.
First, create an environment variable called AUTH0_AUDIENCE on your .env file. Store that value in the following field so that you can use it throughout the instructions presented on this page easily:
APP_NAME=Auth0_LaravelAPP_ENV=localAPP_DEBUG=trueAPP_URL=http://localhost:4040APP_KEY=APP_PORT=4040AUTH0_DOMAIN=AUTH0-DOMAINAUTH0_CLIENT_ID=AUTH0-CLIENT-IDAUTH0_CLIENT_SECRET=AUTH0-CLIENT-SECRETAUTH0_AUDIENCE=AUTH0-AUDIENCE
Next, update the config/auth0.php file to configure this value on your Auth0 service:
<?phpreturn ['domain' => env('AUTH0_DOMAIN'),'clientId' => env('AUTH0_CLIENT_ID'),'clientSecret' => env('AUTH0_CLIENT_SECRET'),'cookieSecret' => env('APP_KEY'),'audience' => [env('AUTH0_AUDIENCE')]];
Update the Message Service
This Laravel application serves local messages from the MessageService. Now, we'll serve both local and external message resources. You'll keep serving local message resources to hydrate the Public and Protected pages. But now we'll call the api/messages/admin endpoint of the API server and use that response to hydrate the Admin page. To accommodate that change on the MessageServiceInterface, we need to replace the Message return type of the getAdminMessage method with array. Open the app/Services/MessageServiceInterface.php file and update it as follows:
<?phpnamespace App\Services;use App\Models\Message;interface MessageServiceInterface{public function getPublicMessage(): Message;public function getProtectedMessage(): Message;public function getAdminMessage(): array;}
You also need to update the app/Services/MessageService.php file to make a request to the API endpoint:
<?phpnamespace App\Services;use App\Models\Message;use Auth0\SDK\Auth0;use GuzzleHttp\Client;use GuzzleHttp\Exception\ClientException;class MessageService implements MessageServiceInterface{private Auth0 $auth0;private string $apiServerUrl;private Client $client;public function __construct(Auth0 $auth0, Client $client, string $apiServerUrl){$this->auth0 = $auth0;$this->apiServerUrl = $apiServerUrl;$this->client = $client;}public function getPublicMessage(): Message{return new Message("This is a public message.");}public function getProtectedMessage(): Message{return new Message("This is a protected message.");}public function getAdminMessage(): array{return $this->fetch('/api/messages/admin', ['Authorization' => 'Bearer ' . $this->getAccessToken()]);}private function fetch(string $uri, array $headers = []): array{try {$result = $this->client->get($this->getServerUrl($uri),['headers' => array_merge(['Content-Type' => 'application/json'], $headers)]);return json_decode($result->getBody()->getContents(), true);} catch (ClientException $ex) {return json_decode($ex->getResponse()->getBody()->getContents(), true);} catch (\Exception $ex) {return ['message' => 'Internal Server Error'];}}private function getServerUrl(string $uri): string{return rtrim($this->apiServerUrl, '/') . '/' . ltrim($uri, '/');}private function getAccessToken(): ?string{return $this->auth0->getAccessToken();}}
This class uses the Auth0 service in order to get the access token from the logged user and make the request to the API server. Both the Auth0 service and the Client instances are injected automatically by Laravel. The $apiServerUrl is not available on the container yet. You'll need to make it available by setting up its value on the container.
To do that, first we create a new environment variable, API_SERVER_URL, that we need to add to the .env file:
APP_NAME=Auth0_LaravelAPP_ENV=localAPP_DEBUG=trueAPP_URL=http://localhost:4040APP_KEY=APP_PORT=4040AUTH0_DOMAIN=AUTH0-DOMAINAUTH0_CLIENT_ID=AUTH0-CLIENT-IDAUTH0_CLIENT_SECRET=AUTH0-CLIENT-SECRETAUTH0_AUDIENCE=AUTH0-AUDIENCEAPI_SERVER_URL=http://localhost:6060
Next, we create a config file at config/message-server.php to be able to use this environment variable inside the application.
touch config/message-server.php
and populate it as follows:
<?phpreturn ['api_server_url' => env('API_SERVER_URL')];
Then, we update the app/Providers/AppServiceProvider.php file as follows to set the value for the $apiServerUrl parameter for the MessageService:
<?phpnamespace App\Providers;use App\Services\MessageService;use App\Services\MessageServiceInterface;use Illuminate\Support\Facades\View;use Illuminate\Support\ServiceProvider;use Illuminate\View\View as ViewObject;class AppServiceProvider extends ServiceProvider{/*** Register any application services.*/public function register(): void{$this->app->when(MessageService::class)->needs('$apiServerUrl')->give(config('message-server.api_server_url'));$this->app->singleton(MessageServiceInterface::class, MessageService::class);}/*** Bootstrap any application services.*/public function boot(): void{View::composer('*', function (ViewObject $view) {$view->with('isAuthenticated', !auth()->guest());});}}
Lastly, we update the resources/views/pages/admin.blade.php view file to use an array instead of a Message object:
@extends('layout')@section('content')<div class="content-layout"><h1 id="page-title" class="content__title">Admin Page</h1><div class="content__body"><p id="page-description"><span>This page retrieves an <strong>admin message</strong> froman external API.</span><br><br><span><strong>Only authenticated users with the <code>read:admin-messages</code> permission should access this page.</strong></span></p><x-code-snippet title="Admin Message" code="{{ json_encode($message, \JSON_PRETTY_PRINT) }}" /></div></div>@endsection
Test the API Integration
To access the admin message page, the logged-in user should have the read:admin-messages permission. Make sure your API backend server is running and the AUTH0_AUDIENCE and AUTH0_DOMAIN are the same on the API server and your web application.
Conclusion
You have implemented user authentication in Laravel to identify your users, get user profile information, and control the content that your users can access by protecting routes and API resources.
This guide covered the most common authentication use case for a Laravel Web application: simple login and logout. However, Auth0 is an extensible and flexible identity platform that can help you achieve even more. If you have a more complex use case, check out the Auth0 Architecture Scenarios to learn more about the typical architecture scenarios we have identified when working with customers on implementing Auth0.
We'll cover advanced authentication patterns and tooling in future guides, such as using a pop-up instead of redirecting users to log in, adding claims to ID tokens, using metadata to enhance user profiles, and much more.