

This guide helps you learn how to deploy to Vercel a Vue.js application secured with Auth0. This guide assumes that you have secured your Vue.js application using the Auth0 Vue.js SDK, which provides developers with a high-level API to handle many authentication implementation details.
General Guidelines for Vue.js Deploys on Vercel
You may be building your Vue.js application separately from your backend application. For example, your backend exposes an API that your Vue.js application consumes. In that scenario, your Vue.js app is essentially a static app. You can deploy the built content in the dist directory to any static file server, but you need to set the correct publicPath.
You can use Vercel to deploy your Vue.js application as a purely static app. However, deploying your Vue.js Single-Page Application (SPA) to Vercel won't work as expected if you are using the Vue.js Router in certain modes: HTML5 mode for Vue.js 3 applications and history mode for Vue.js v2 applications. Your users will get a 404 error from the static file server whenever they visit a route directly other than the / route, such as /profile.
You can fix that by configuring your production server to fall back to index.html, which is the entry point of your SPA, for any requests that do not match a static file. The Vue.js Router docs provide configuration instructions to set up your Vercel server.
Assuming that you are serving your app from the root folder, create a vercel.json file under the root directory of your Vue.js project and populate it with the following content:
{"rewrites": [{ "source": "/:path*", "destination": "/index.html" }]}
Get the Auth0 Domain and Client ID
Start by logging in to your Auth0 account and open the Applications section of the Auth0 Dashboard. Then, select the Auth0 application registration associated with your Vue.js application.
Click on the "Settings" tab and locate the "Basic Information" section. Under this section, you'll find the "Domain" and "Client ID" values.
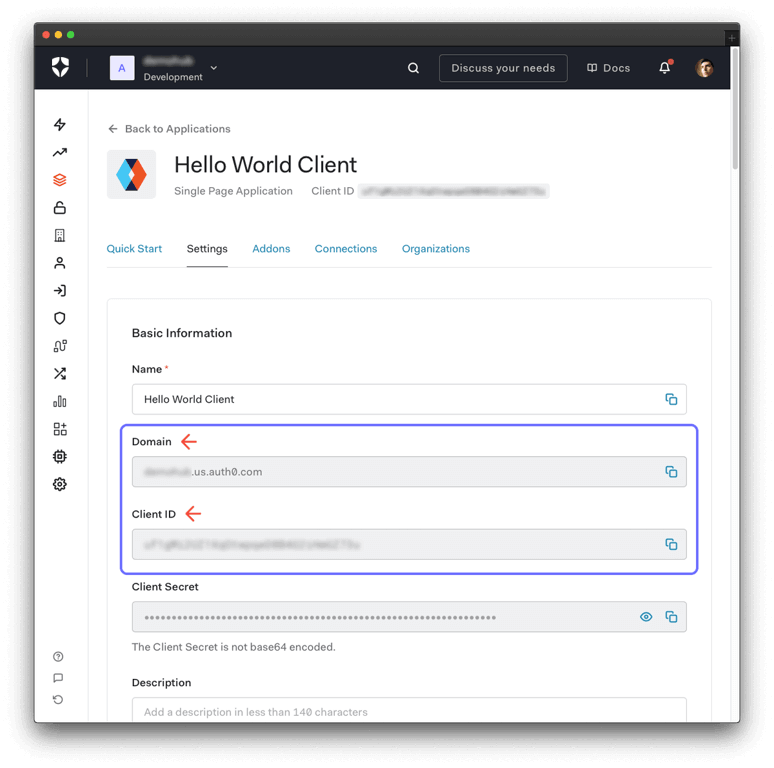
These variables let your Vue.js application identify itself as an authorized party to interact with the Auth0 authentication server.
When you enter a value in the input fields present on this page, any code snippet that uses such value updates to reflect it. Using the input fields makes copying and pasting code as you follow along easy.
As such, enter the "Domain" and "Client ID" values in the following fields, as you will use them when configuring the environment variables for your project in Vercel in the next sections:
Don't close this page since you'll need to come back and configure the "Application URIs" section after importing your project on Vercel.
Import Your Vue.js Project to Vercel
Start by logging in to the Vercel Dashboard to import your Vue.js project.
Click the "Add New" drop-down and select the "Project" option. A Vercel page to import an existing Git repository loads up.
Select the project you want to import by clicking the "Import" button. During this step, Vercel will try to infer the framework preset of your repository and, based on it, set default build and output settings. A Vercel page for configuring your project page loads up. Modify the default configuration settings as needed.
Next, click the "Environment Variables" options within the "Configure Project" section to define environment variables related to Auth0. You need the Auth0 Domain and Auth0 Client ID to connect your Vue.js application once deployed to Vercel with the Auth0 Authentication Server.
Start by defining the Auth0 Domain by entering the following information in the environment variable field:
VITE_AUTH0_DOMAIN
AUTH0-DOMAIN
Click the "Add" button.
Next, define the Auth0 Client ID as follows:
VITE_AUTH0_CLIENT_ID
AUTH0-CLIENT-ID
Once again, click the "Add" button.
With these Auth0 environment variables in place, click the "Deploy" button to kickstart the Vercel deployment process for Vue.js Single-Page Applications (SPAs).
While your Vue.js application runs on Vercel, it will redirect users to Auth0 whenever they trigger an authentication request. Auth0 will present your users with the Auth0 Universal Login page. Once your users log in, Auth0 will redirect them to your Vue.js application. For that redirecting to happen securely, you must specify in your Auth0 Application Settings the URLs to which Auth0 can redirect users once it authenticates them. That is, you need to define the Vercel production deployment URL of your Vue.js application as an "Auth0 Allowed Callback URL".
Use Your Vercel Production URL in Auth0
Let's start by getting your Vercel production deployment URL.
Select your project from the Vercel Dashboard.
Click on the "Settings" tab and then the "Domains" option on the sidebar. This section uses tags to show the domains that Vercel has assigned to your production and preview deployments.
Locate the domain with the "Production" tag. Copy and paste that domain value into the following field:
Head back to the "Settings" section of your Auth0 application registration in the Auth0 Dashboard and locate the "Application URIs" section. Fill in the following values:
https://VERCEL-PRODUCTION-DOMAIN
The above value is the URL that Auth0 can use to redirect your users after they successfully log in.
https://VERCEL-PRODUCTION-DOMAIN
The above value is the URL that Auth0 can use to redirect your users after they log out.
https://VERCEL-PRODUCTION-DOMAIN
Using the Auth0 Vue SDK, your Vue.js application will make requests under the hood to an Auth0 URL to handle authentication requests. As such, you need to add your Vue.js application origin URL to avoid Cross-Origin Resource Sharing (CORS) issues.
Scroll down and click the "Save Changes" button.
This completes the configuration of your Vue.js application to work with Auth0 while it is running on Vercel. Now, you can log in to your Vue.js application using your Vercel production URL.
Use Your Deployed Vue.js Application
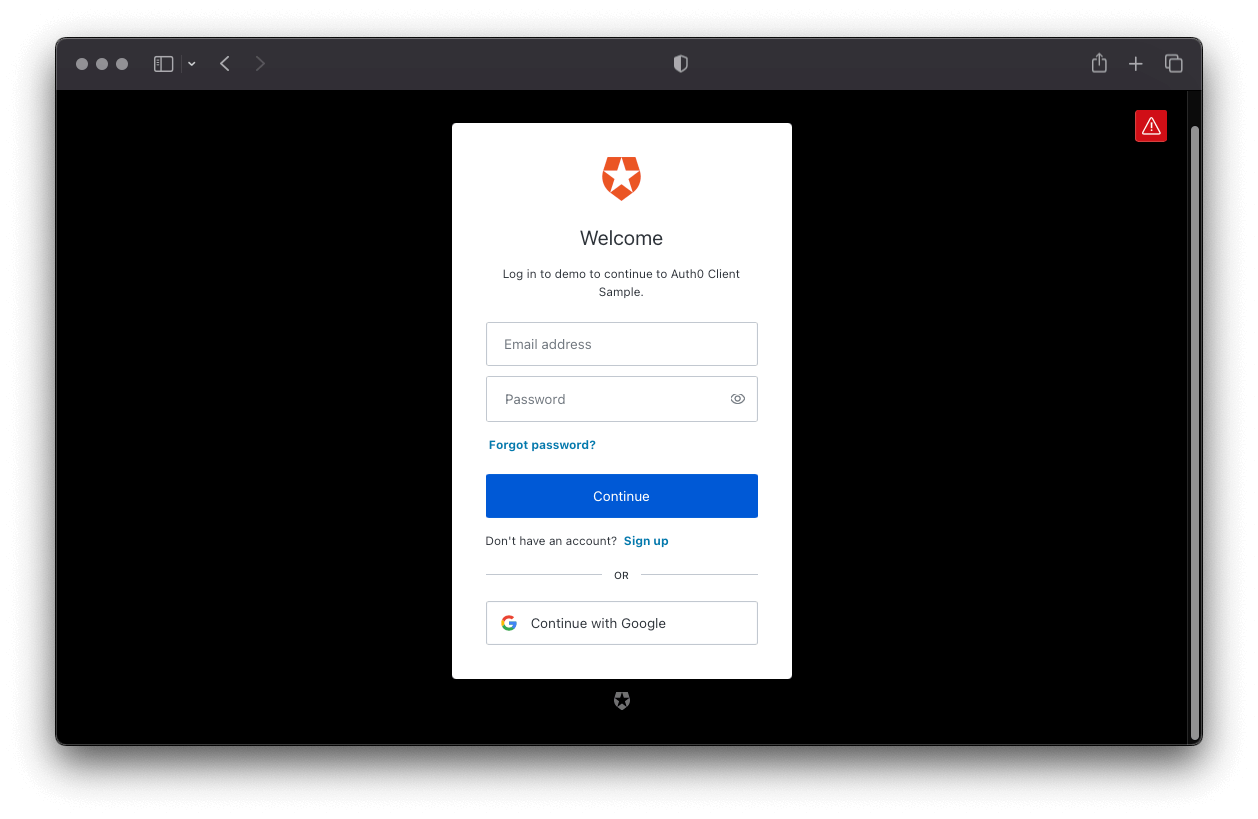
Visit your Vue.js application using your Vercel production URL. Assuming that you created authentication buttons, click the login button.
Vue.js takes you to the Auth0 Universal Login page. You can use the form to log in with a username and password or a social identity provider like Google.
Once you have signed in using the Universal Login page, Auth0 will redirect you to the Vue.js application deployed on Vercel. The Auth0 Vue SDK tracks the authentication state of your users through the isAuthenticated value. You can use this value to render UI elements conditionally based on the authentication state of your users.
Finally, click the logout button. This will clear the application session and redirects you to the Auth0 /v2/logout endpoint to clear the Auth0 session and redirect back to your application.
Next Steps
You have learned to deploy a Vue.js application secured with Auth0 to Vercel. Auth0 is an extensible and flexible identity platform that can help you achieve even more. If you have a more complex use case, check out the Auth0 Architecture Scenarios to learn more about the typical architecture scenarios we have identified when working with customers on implementing Auth0.
Let us know in the comments below what you think of this tutorial or if you have any issues following this guide for deploying your Vue.js application secured by Auth0 to Vercel.
