

One of the most common requirements when building mobile applications is calling an API to retrieve and save data. In scenarios where the application authenticates its users, it is common that the API will implement protection against unauthorized access, which could mean that only authenticated users would have access to make requests, or it could use more sophisticated authorization rules to validate what a user can do or access from an API.
In this guide, we will discuss the steps involved in calling a protected API endpoint from a React Native mobile app using Expo and Auth0, including setting up authentication, handling access tokens, and sending authorized requests.
By the end of this guide, you will clearly understand how to securely call a protected API endpoint from your mobile application.
How Do We Call a Protected API Endpoint
You need to follow a few basic steps to call a protected API endpoint using OAuth2 and Auth0.
Here's an overview of how to call a protected API endpoint using OAuth:
- Register your application with the OAuth2 provider: To get started, you need to register your application with the OAuth2 provider, such as Auth0. This involves creating a client ID and client secret that your application will use to authenticate with the provider.
- Authenticate the user: To access protected resources on behalf of the user, you need to authenticate the user with the OAuth2 provider. This involves redirecting the user to the provider's login page, where they will enter their credentials and grant your application permission to access their protected resources.
- Obtain an access token: After the user has been authenticated, your application will receive an access token that can be used to access protected resources on behalf of the user.
- Call the protected API endpoint: Once you have obtained an access token, you can use it to call the protected API endpoint. The API server will validate the access token to ensure that the user has the necessary permissions to access the requested resource. The access token is typically included in the HTTP Authorization header in the format
Bearer {access_token}. - Handle errors: It's important to handle any errors that may occur during the request, such as expired or invalid access tokens. You can use the OAuth2 library to automatically refresh the access token if it has expired or become invalid, or display an appropriate error message to the user.
In this tutorial, we'll build a React Native mobile application with Expo, and we'll implement all the steps provided above using Auth0 and the React Native Auth0 SDK. Although we won't focus on the API code, we'll provide a sample API for you to follow along.
Register Your Application with Auth0
Before we start coding, let's create a client application on Auth0. For that, you'll need an Auth0 account, if you don't have it yet, you can sign up for free.
Once in the dashboard, move to the Applications section and follow these steps:
- Click on Create Application.
- Provide a friendly name for your application (for example, My React Native App) and choose Native as the application type.
- Finally, click the Create button.
Next, you need to set up the Allowed Callback and Allowed Logout URLs. The first value tells Auth0 to which URL a user should redirect after the user authenticates, while the second value tells Auth0 to which URL the user should redirect after they log out.
Both fields will contain the same values, which are structured as follows:
- iOS:
{schema}://{yourDomain}/ios/{schema}/callback - Android:
{schema}://{yourDomain}/android/{schema}/callback
The value for {schema} is defined in your React Native application. For this tutorial, we'll use auth0-rn-demo. The {yourDomain} value is available in the settings tab of your Auth0 application.
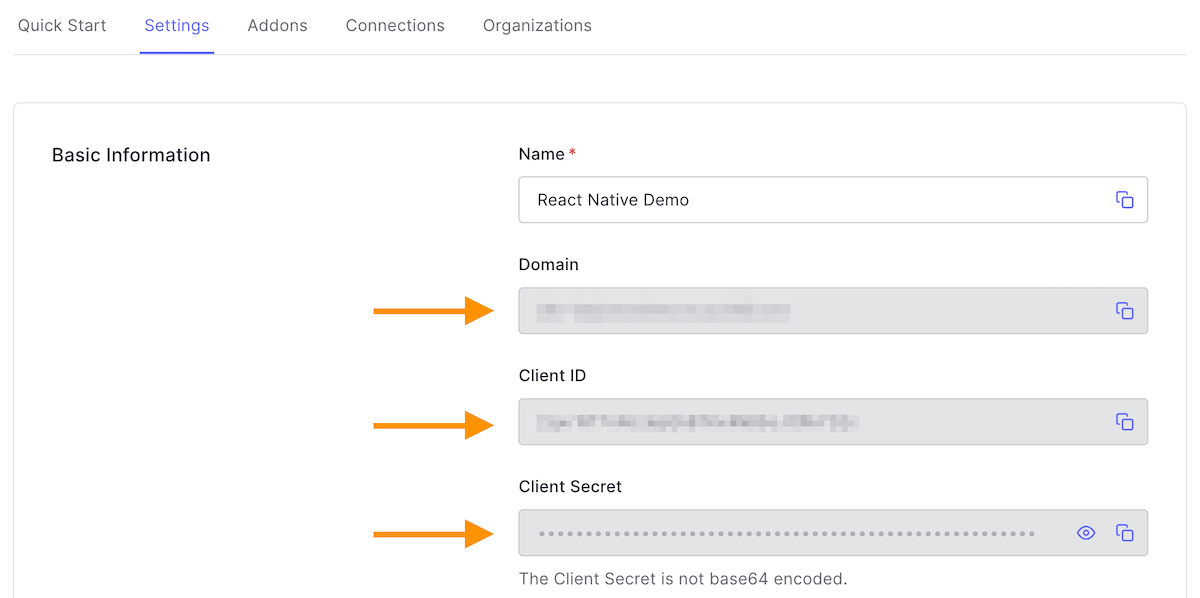
Take note of those fields as we'll use them later, but don't worry. You can always get them back from your Auth0 dashboard.
Now we are ready to build and set up the Allowed Callback and Allowed Logout URLs. In order to set the values for both Android and iOS, we'll add the two different URLs as a comma-separated string. Here's what it looks like for my chosen schema and domain: auth0-rn-demo://YOUR_AUTH0_DOMAIN/ios/com.auth0.rndemo/callback,auth0-rn-demo://YOUR_AUTH0_DOMAIN/android/com.auth0.rndemo/callback.
After you enter the values on the fields, click the Save Changes button at the end of the form to apply them.
Create an Expo Application
To get us started, let's create a new Expo application using the Expo CLI:
npx create-expo-app react-native-auth0-demo
Finally, enter the application folder:
cd react-native-auth0-demo
Now we are ready to start adding authentication to the application.
Add Authentication
Now that the basic settings for connecting your application to Auth0 are in place, it's time to add authentication to your application. This involves making some changes to your application and using the settings you have configured. Let's take it one step at a time.
npx expo install react-native-auth0 dotenv
Since the React Native Auth0 SDK runs custom native code that must be configured at build time, we'll have to config Expo Config Plugins with Auth0 details and generate the native source code.
The first step is to rename the file app.json to app.config.js, this is because we'll run code in the settings to load data from environment variables. Then change the structure of the file to return the JSON equivalent. At the end, your file will look like this:
export default {"expo": {"name": "react-native-auth0-demo","slug": "react-native-auth0-demo","version": "1.0.0","orientation": "portrait","icon": "./assets/icon.png","userInterfaceStyle": "light","splash": {"image": "./assets/splash.png","resizeMode": "contain","backgroundColor": "#ffffff"},"assetBundlePatterns": ["**/*"],"ios": {"supportsTablet": true},"android": {"adaptiveIcon": {"foregroundImage": "./assets/adaptive-icon.png","backgroundColor": "#ffffff"}},"web": {"favicon": "./assets/favicon.png"}}};
Now, we are ready to add the Auth0 and schema settings:
export default {"expo": {..."ios": {"bundleIdentifier": "com.auth0.rndemo", // 👈 new code"supportsTablet": true},"android": {"adaptiveIcon": {"foregroundImage": "./assets/adaptive-icon.png","backgroundColor": "#ffffff"},"package": "com.auth0.rndemo" // 👈 new code},...// 👇 new code"plugins": [["react-native-auth0",{"domain": "{yourDomain}","customScheme": "auth0-rn-demo"}]],// 👆 new code...}};
Finally, we can run npx expo prebuild to generate the native code. This process may take a few minutes, and at the end, it will update a few things and create two new folders, android and ios, with the respective native code for each platform.
Next, we can start working on the application code. Since we don't need any default boilerplate for the file App.js we'll clear it out and start from zero.
Here is what our new App.js looks like:
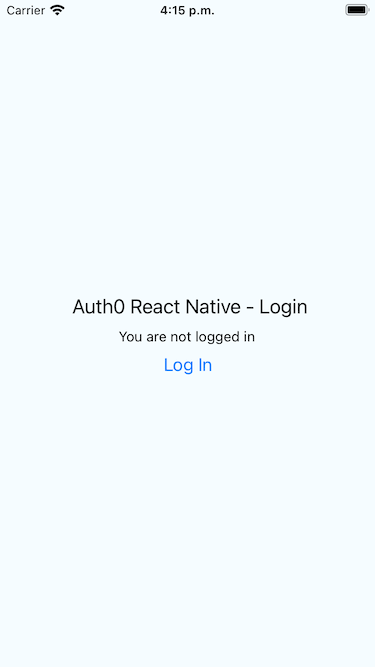
import { StyleSheet, Text, View } from 'react-native';function Home() {return (<View style={styles.container}><Text style={styles.header}> Auth0 React Native - Login </Text></View>);}export default function App() {return (<Home />);}const styles = StyleSheet.create({container: {flex: 1,justifyContent: 'center',alignItems: 'center',backgroundColor: '#F5FCFF',},header: {fontSize: 20,textAlign: 'center',margin: 10,},});
At this point, the app is quite dull as it only displays simple text on the screen.
Configure the Auth0Provider component
The new Auth0 hooks API relies on a React Context for state management. You'll have to set up the Auth0Provider component at the uppermost level of your application.
We do it in our App component, wrapping the Home component we created.
import {Auth0Provider} from 'react-native-auth0'; // 👈 new code...export default function App() {return (<Auth0Provider domain={"{yourDomain}"} clientId={"{yourClientId}"}> {/* 👈 new code */}<Home /></Auth0Provider> // 👈 new code);}...
The Auth0Provider expects the Auth0 Domain and Client ID from your Auth0 application.
Add login to your application
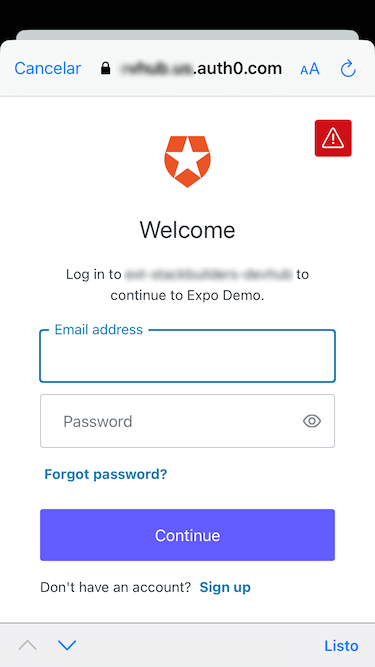
To initiate the login flow in your application and redirect users to the Auth0 Universal Login page for authentication, you simply need to call the authorize function from the Auth0 React Native SDK as follows:
// 👇 updated codeimport {useAuth0, Auth0Provider} from 'react-native-auth0';import { StyleSheet, Text, View, Button } from 'react-native';// 👆 updated codeconst customScheme = 'auth0-rn-demo'; // 👈 new codefunction Home() {// 👇 new codeconst {authorize, user} = useAuth0();const onLogin = async () => {try {await authorize({scope: 'openid profile email'}, {customScheme: customScheme});} catch (e) {throw Error('There was an issue authenticating the user. Please try again.');}};// 👆 new code...}...
For our use case, we'll set the scope and the customScheme of our application, however at this step you can also provide additional parameters. You can learn more about authorize on the official docs.
Next, we attached our onLogin function to a button on the screen, and we can run the application.
const Home = () => {...return (<View style={styles.container}><Text style={styles.header}> Auth0 React Native - Login </Text>// 👇 new code<ButtononPress={onLogin}title={'Log In'}/>// 👆 new code</View>);};
Now you can run your application on your favorite emulator.
For iOS:
npm run ios
For Android:
npm run android
Running the application, you should see screens like these:
If you have tried the application and it worked as intended thus far, you'll notice that after logging in with your user, the application interface didn't change. You still have the "login" button as if nothing happened.
Let's fix that next by adding a logout button that will be visible when the user is authenticated.
Add logout to your application
To log users out, we simply need to redirect them to the Auth0 logout endpoint by calling the clearSession method from the Auth0 SDK. This will remove the sessions from the authentication server and log the user out from the application state.
Let's add it now to our application:
const Home = () => {const {authorize, user, clearSession} = useAuth0(); // 👈 updated code...// 👇 new codeconst onLogout = async () => {try {await clearSession({customScheme: customScheme});} catch (e) {console.log('Log out cancelled');}};const loggedIn = user !== undefined && user !== null;// 👆 new codereturn (<View style={styles.container}><Text style={styles.header}> Auth0 React Native - Login </Text>// 👇 updated code<ButtononPress={loggedIn ? onLogout : onLogin}title={loggedIn ? 'Log Out' : 'Log In'}/>// 👆 updated code</View>);};
When you now run the application, first you are asked to log in, and after you do, the button will change to "Log Out", and after clicking you will be logged out of the session going back to the application's first state.
Show user profile information
Now that we can control the flow of our application depending if a user is logged in or not, we can also choose to display information about the logged-in user on the screen.
Doing it is very simple with Auth0, as during authentication, the SDK receives an ID Token, which contains basic information about the user, and we can get access to that information through the useAuth0 hook.
Let's see an example:
const Home = () => {...return (<View style={styles.container}><Text style={styles.header}> Auth0 React Native - Login </Text>// 👇 new code{user && <Text>You are logged in as {user.name}</Text>}{!user && <Text>You are not logged in</Text>}// 👆 new code<ButtononPress={loggedIn ? onLogout : onLogin}title={loggedIn ? 'Log Out' : 'Log In'}/></View>);...}
Simply by leveraging the user object we can get the user name, email and other properties available in your ID Token.
Now we are ready to talk with an API.
Set up an API
Before we can continue working on our mobile application, we'll need an API. If you already have an API protected with Auth0, great!, you can use that. If not, I recommend downloading one of our sample applications from the developer center.
I recommend downloading and setting up the Express.js Code Sample as it uses JavaScript, but any other API will do. You can opt to learn how to protect an API with Auth0, or checkout to the ready to go repository and set up your Auth0 environment variables.
After you have your API up and running, continue with this tutorial.
Call a Protected Endpoint
Calling a protected endpoint is a three steps process, first is to authenticate the user, which we have already done. Next is to get an Access Token and finally to make the HTTP call to an API endpoint with the Access Token.
The first step is the most time-consuming as you need to set many things up. Steps two and three are much more straightforward.
Request an Access Token
To call a protected API, your React Native application needs to make an HTTP request by including a valid access token in the Authorization header.
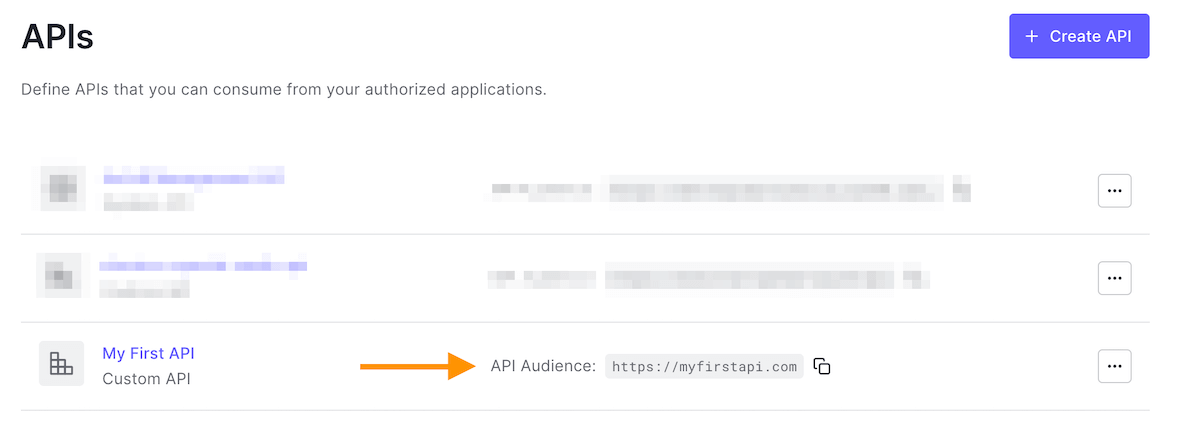
But before we can request an access token from Auth0, we need to make sure we identify the API we want access to during the authorize call. We do that by passing the audience (or API identifier) to the method call.
You set up this value when you created an Auth0 API, if you don't remember it, no worries, you can always get it from the Auth0 Dashboard.
Let's add this new value into our code:
...const onLogin = async () => {try {await authorize({scope: 'openid profile email',audience: '{yourAudience}', // 👈 new code}, {customScheme: customScheme});} catch (e) {throw Error('There was an issue authenticating the user. Please try again.');}};...
The next step is to request your access token, which you can do in a single line of code, thanks to the Auth0 React Native SDK.
const accessToken = (await getCredentials()).accessToken;
Access tokens can be hard to work with as there are many things to consider, like Refresh Tokens, expirations, safe storage, etc. Thankfully with the Auth0 React Native SDK, we don't need to worry about any of that, as all the nuisances are abstracted into the getCredentials function.
Let's integrate it into our app in the next section.
Calling a protected endpoint
In this last step of the tutorial, we'll write a new function to retrieve an access token and call an API endpoint. If you use one of our sample APIs from the Developer Center, you can take the following code as is. However, if you run your own API, you may want to change the endpoint and how you process the output.
Let's see this in action:
import { StyleSheet, Text, View, Button, Alert } from 'react-native'; // 👈 updated code...const Home = () => {const {authorize, clearSession, user, getCredentials} = useAuth0(); // 👈 updated code...// 👇 new codeconst onCallAPI = async () => {const accessToken = (await getCredentials()).accessToken;const apiResponse = await fetch('http://localhost:6060/api/messages/protected', {headers: {'Authorization': `Bearer ${accessToken}`}});Alert.alert(await apiResponse.text());}// 👆 new codereturn (<View style={styles.container}><Text style={styles.header}> Auth0 React Native - Login </Text>{user && <Text>You are logged in as {user.name}</Text>}{!user && <Text>You are not logged in</Text>}// 👇 new code{user && <Button title="Call API" onPress={onCallAPI} />}// 👆 new code<ButtononPress={loggedIn ? onLogout : onLogin}title={loggedIn ? 'Log Out' : 'Log In'}/></View>);...
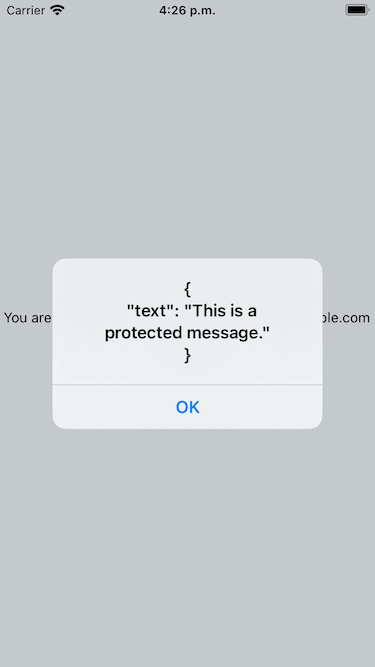
If everything goes well and you try the application, you'll see an Alert message from the app with the API outputs.
Summary
Congrats! If you made it here, you have learned a lot.
You successfully set up a React Native mobile application with Auth0 to authenticate users, adapt the UI to the authentication state, and finally retrieve an access token for a specific API and then call a protected endpoint of that API.
We also covered some fundamentals of web security and how the Auth0 React Native SDK can help you solve some of the hurdles of handling tokens.
You can download the final source code built in this guide from this Github repository.
Thanks for reading!