Developers can easily secure a full-stack application using Auth0. This code sample demonstrates how to implement authentication in a client application built with React and TypeScript, as well as how to implement authorization in an API server built with Django and Python. You'll connect the client and server applications to see the full security flow in action!
Let's get started!
Quick Auth0 Set Up
To get started, create an Auth0 account to connect your application with the Auth0 Identity Platform. You can also use any of your existing Auth0 accounts.
Get the Auth0 domain and client ID
-
Open the Applications section of the Auth0 Dashboard.
-
Click on the Create Application button and fill out the form with the following values:
-
Name:
Hello World Client -
Application Type: Single Page Web Applications
-
-
Click on the Create button.
An Auth0 Application page loads up.
As such, click on the "Settings" tab of your Auth0 Application page, locate the "Application URIs " section, and fill in the following values:
-
Allowed Callback URLs:
http://localhost:4040/callback -
Allowed Logout URLs:
http://localhost:4040 -
Allowed Web Origins:
http://localhost:4040
Scroll down and click the "Save Changes" button.
Next, locate the "Basic Information" section.
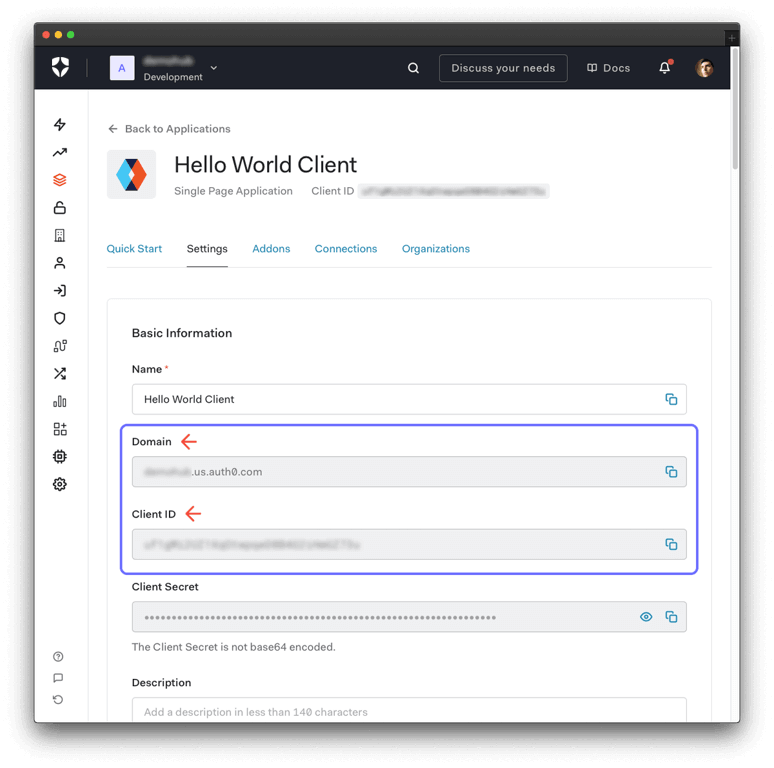
When you enter a value in the input fields present on this page, any code snippet that uses such value updates to reflect it. Using the input fields makes it easy to copy and paste code as you follow along.
As such, enter the "Domain" and "Client ID" values in the following fields to set up your single-page application in the next section:
Get the Auth0 audience
-
Open the APIs section of the Auth0 Dashboard.
-
Click on the Create API button and fill out the "New API" form with the following values:
-
Name:
Hello World Server -
Identifier:
https://hello-world.example.com
-
-
Click on the Create button.
When setting up APIs, we also refer to the API identifier as the Audience value. Store that value in the following field to set up your API server in the next section:
Set Up and Run the Django Project
Ensure that you have Python
v3.7or higher installed in your machine.
Start by cloning the Django project:
git clone https://github.com/auth0-developer-hub/api_django_python_hello-world.git
Make the project directory your current working directory:
cd api_django_python_hello-world
Then, check out the basic-authorization branch, which holds all the code related to implementing token-based authorization to protect resources in a Django API:
git checkout basic-authorization
Create a virtual environment under the root project directory using the appropriate command for your operating system:
python3 -m venv venv
Then, activate the virtual environment:
. venv/bin/activate
Install the Django project dependencies:
pip install -r requirements.txt
Use the following command to generate a random secret key for Django:
python -c "from django.core.management.utils import get_random_secret_key;print(get_random_secret_key())"
Store the output from the command above in the following field:
Now, create a .env file under the project directory and populate it as follows:
DJANGO_SECRET_KEY=KEY-VALUECLIENT_ORIGIN_URL=http://localhost:4040PORT=6060DEBUG_ENABLE=falseAUTH0_DOMAIN=AUTH0-DOMAINAUTH0_AUDIENCE=AUTH0-AUDIENCE
With the .env file all set up, run the database migrations:
python manage.py migrate
Finally, execute the following command to run the Django server:
gunicorn
Set Up the React TypeScript Project
Start by cloning the project into your local machine:
git clone https://github.com/auth0-developer-hub/spa_react_typescript_hello-world.git
Make the project directory your current working directory:
cd spa_react_typescript_hello-world
Then, check out the basic-authentication-with-api-integration branch, which holds all the code related to implementing user login in React:
git checkout basic-authentication-with-api-integration
Next, install the React project dependencies:
npm install
Once you have access to the React project, create a .env file under the project directory and populate it as follows:
REACT_APP_AUTH0_DOMAIN=AUTH0-DOMAINREACT_APP_AUTH0_CLIENT_ID=AUTH0-CLIENT-IDREACT_APP_AUTH0_CALLBACK_URL=http://localhost:4040/callbackREACT_APP_AUTH0_AUDIENCE=AUTH0-AUDIENCEREACT_APP_API_SERVER_URL=http://localhost:6060
Run the React application by issuing the following command:
npm start
You can now visit http://localhost:4040/ to access the application.
There's something missing in this React code sample. There's no login or sign-up forms!
When you use Auth0, you don't need to build any login or sign-up forms! Your users can log in to your application through a page hosted by Auth0, which provides a secure, standards-based login experience. You can customize the Auth0 login page with your branding and enable different authentication methods, such as logging in with a username/password combination or a social provider like Facebook or Google.
Once you log in, visit the protected "Profile" page (http://localhost:4040/profile) to see all the user profile information that Auth0 securely shares with your application using ID tokens.
Then, visit the "Protected" page (http://localhost:4040/protected) or the "Admin" page (http://localhost:4040/admin) to practice requesting protected resources from an external API server using access tokens.