

The React examples on this guide apply to React v18+ and React Router v6. These examples help you learn the following security concepts:
- How to add user login, sign-up, and logout to React applications.
- How to use the new React Router
v6features to create route guards that protect React application routes. - How to make API calls from React to request data from a protected API.
- How to get user profile information to personalize a React user interface.
This guide uses the Auth0 React SDK, which provides developers with a high-level API to handle many user authentication implementation details. You can now secure your React applications following security best practices while writing less code.
Quick React Setup
With the help of Auth0 by Okta, you don't need to be an expert on identity protocols, such as OAuth 2.0 or OpenID Connect, to understand how to secure your web application stack.
You first integrate your React application with Auth0. Your application will then redirect users to an Auth0 customizable login page when they need to log in. Once your users log in successfully, Auth0 redirects them back to your React app, returning JSON Web Tokens (JWTs) with their authentication and user information.
Get the React Starter Application
We have created a starter project using create-react-app to help you learn React security concepts through hands-on practice. You can focus on building React components and JavaScript services to secure your application.
Start by cloning the spa_react_javascript_hello-world_react-router-6 repository on its starter branch:
Once you clone the repo, make spa_react_javascript_hello-world_react-router-6 your current directory:
cd spa_react_javascript_hello-world
Install the React project dependencies as follows:
npm install
This starter React project offers a functional application that consumes data from an external API to hydrate the user interface. For simplicity and convenience, the starter project simulates the external API locally using json-server. Later on, you'll integrate this React application with a real API server using a backend technology of your choice.
The compatible API server runs on http://localhost:6060 by default. As such, to connect your React application with that API server, create a .env file under the root project directory:
touch .env
Populate it with the following environment variables:
REACT_APP_API_SERVER_URL=http://localhost:6060
Keep in mind that a React project generated using create-react-app application will only expose environment variables from .env to your processed code if those variables are prefixed with REACT_APP_. This practice helps you prevent accidentally leaking your system's environment variables to your client application.
Next, execute the following command to run the JSON server API:
npm run api
Finally, open another terminal tab and execute this command to run your React application:
npm start
You are ready to start implementing user authentication in this React project. First, you'll need to configure the React application to connect successfully to Auth0. Afterward, you'll use the Auth0 React SDK to log in users, protect routes, display user profile information, and request protected data from an external API server to hydrate some of the application pages.
Configure React with Auth0
Follow these steps to get started with the Auth0 Identity Platform quickly:
Sign up and create an Auth0 Application
A free account also offers you:
- Auth0 Universal Login for Web, iOS & Android.
- Up to 2 social identity providers like Google, GitHub, and Twitter.
- Up to 3 Actions, Rules, & Hooks to customize and extend Auth0's capabilities.
During the sign-up process, you create something called an Auth0 Tenant, representing the product or service to which you are adding authentication.
Once you sign in, Auth0 takes you to the Dashboard. In the left sidebar menu, click on "Applications".
Then, click the "Create Application" button. A modal opens up with a form to provide a name for the application and choose its type. Use the following values:
Auth0 React Code Sample


Click the "Create" button to complete the process. Your Auth0 application page loads up.
In the next step, you'll learn how to help React and Auth0 communicate.
What's the relationship between Auth0 Tenants and Auth0 Applications?
Let's say that you have a photo-sharing React app called "Reactigram". You then would create an Auth0 tenant called reactigram. From a customer perspective, Reactigram is that customer's product or service.
Now, say that Reactigram is available on three platforms: web as a single-page application and Android and iOS as a native mobile application. If each platform needs authentication, you need to create three Auth0 applications to provide the product with everything it needs to authenticate users through that platform.
Reactigram users belong to the Auth0 Reactigram tenant, which shares them across its Auth0 applications.
Create a communication bridge between React and Auth0
When using the Auth0 Identity Platform, you don't have to build login forms. Auth0 offers a Universal Login Page to reduce the overhead of adding and managing authentication.
How does Universal Login work?
Your React application will redirect users to Auth0 whenever they trigger an authentication request. Auth0 will present them with a login page. Once they log in, Auth0 will redirect them back to your React application. For that redirecting to happen securely, you must specify in your Auth0 Application Settings the URLs to which Auth0 can redirect users once it authenticates them.
As such, click on the "Settings" tab of your Auth0 Application page, locate the "Application URIs" section, and fill in the following values:
http://localhost:4040/callback
The above value is the URL that Auth0 can use to redirect your users after they successfully log in.
http://localhost:4040
The above value is the URL that Auth0 can use to redirect your users after they log out.
http://localhost:4040
Using the Auth0 React SDK, your React application will make requests under the hood to an Auth0 URL to handle authentication requests. As such, you need to add your React application origin URL to avoid Cross-Origin Resource Sharing (CORS) issues.
Scroll down and click the "Save Changes" button.
Do not close this page yet. You'll need some of its information in the next section.
Add the Auth0 configuration variables to React
From the Auth0 Application Settings page, you need the Auth0 Domain and Client ID values to allow your React application to use the communication bridge you created.
What exactly is an Auth0 Domain and an Auth0 Client ID?
Domain
When you created a new Auth0 account, Auth0 asked you to pick a name for your tenant. This name, appended with auth0.com, is your Auth0 Domain. It's the base URL that you will use to access the Auth0 APIs and the URL where you'll redirect users to log in.
Client ID
Each application is assigned a Client ID upon creation, which is an alphanumeric string, and it's the unique identifier for your application (such as q8fij2iug0CmgPLfTfG1tZGdTQyGaTUA). You cannot modify the Client ID. You will use the Client ID to identify the Auth0 Application to which the Auth0 SPA SDK needs to connect.
Warning: Another critical piece of information present in the "Settings" is the Client Secret. This secret protects your resources by only granting tokens to requestors if they're authorized. Think of it as your application's password, which must be kept confidential at all times. If anyone gains access to your Client Secret, they can impersonate your application and access protected resources.
Head back to your Auth0 application page and click on the "Settings" tab.
Locate the "Basic Information" section and follow these steps to get the Auth0 Domain and Auth0 Client ID values:
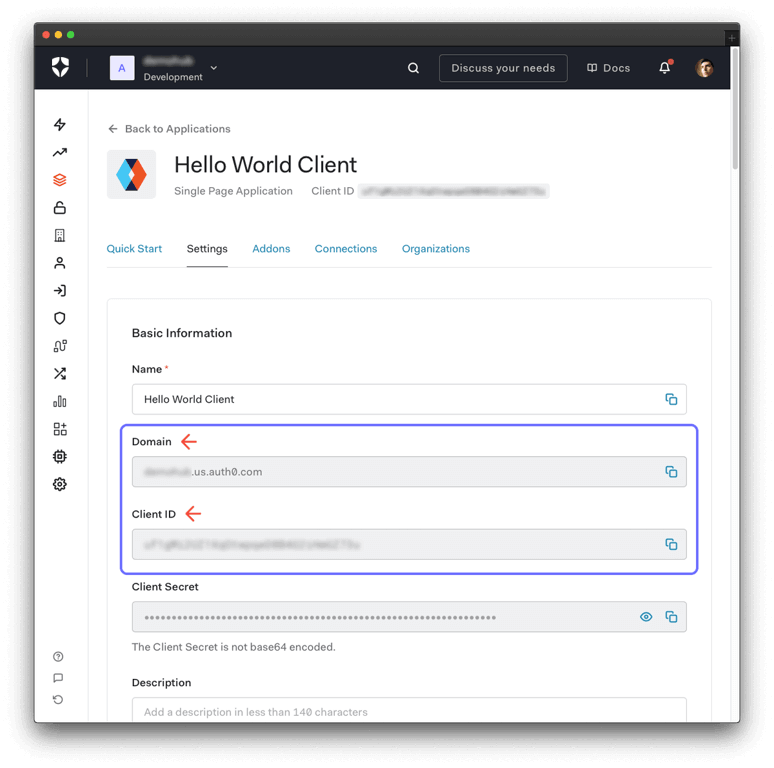
When you enter a value in the input fields present on this page, any code snippet that uses such value updates to reflect it. Using the input fields makes it easy to copy and paste code as you follow along.
As such, enter the "Domain" and "Client ID" values in the following fields to set up your single-page application in the next section:
These variables let your React application identify itself as an authorized party to interact with the Auth0 authentication server.
Now, update the .env file under the React project directory as follows:
REACT_APP_API_SERVER_URL=http://localhost:6060REACT_APP_AUTH0_DOMAIN=AUTH0-DOMAINREACT_APP_AUTH0_CLIENT_ID=AUTH0-CLIENT-IDREACT_APP_AUTH0_CALLBACK_URL=http://localhost:4040/callback
Restart your development server for your React project to become aware of these .env file changes:
npm start
Once you reach the "Call a Protected API from React" section of this guide, you'll learn how to use REACT_APP_API_SERVER_URL along with an Auth0 Audience value to request protected resources from an external API that is also protected by Auth0. For now, the application is using json-server to mock the API.
Handle the Auth0 post-login behavior
Notice that the Auth0 Callback URL, REACT_APP_AUTH0_CALLBACK_URL, points to http://localhost:4040/callback, which is the URL that Auth0 uses to redirect your users after they successfully log in. For this React application, you'll render a simple page component for the /callback route.
Create a callback-page.js file under the src/pages directory:
touch src/pages/callback-page.js
Populate src/pages/callback-page.js with the following code:
import React from "react";import { NavBar } from "../components/navigation/desktop/nav-bar";import { MobileNavBar } from "../components/navigation/mobile/mobile-nav-bar";export const CallbackPage = () => {return (<div className="page-layout"><NavBar /><MobileNavBar /><div className="page-layout__content" /></div>);};
The callback-page.js component will only render the navigation bar and an empty content container to help you create a smooth transition between a route with no content, /callback, to a route with content, such as the /profile page.
The next step is to integrate your callback-page.js component with the React Router.
Locate the src/app.js file, which defines your React application routes using the <Routes> and <Route> components from React Router v6, and update it like so:
import React from "react";import { Route, Routes } from "react-router-dom";import { AdminPage } from "./pages/admin-page";import { CallbackPage } from "./pages/callback-page";import { HomePage } from "./pages/home-page";import { NotFoundPage } from "./pages/not-found-page";import { ProfilePage } from "./pages/profile-page";import { ProtectedPage } from "./pages/protected-page";import { PublicPage } from "./pages/public-page";export const App = () => {return (<Routes><Route path="/" element={<HomePage />} /><Route path="/profile" element={<ProfilePage />} /><Route path="/public" element={<PublicPage />} /><Route path="/protected" element={<ProtectedPage />} /><Route path="/admin" element={<AdminPage />} /><Route path="/callback" element={<CallbackPage />} /><Route path="*" element={<NotFoundPage />} /></Routes>);};
What are the benefits of using a callback page?
Implementing a page that specializes in handling the user redirection from the Auth0 Universal Login Page to your application (the callback event) has some benefits:
- Your users won't see any flashing of the home page component, which renders at the root path,
/. - By showing the navigation bar in the
/callbackroute, your user may feel that your React application loads fast. - By not showing the footer, your users may feel that your React application loads smoothly.
- If you were to render the footer component, your application may appear to be jumpy as the footer may show up briefly but then it would be pushed down when the content above it loads.
- You can avoid making unnecessary or costly API calls that may run when loading your home page components.
Once you add a login and logout button to this app, you can verify this user experience improvement by using your browser's developer tools. In the case of Google Chrome, you could do the following:
-
Configure Chrome to emulate slow network connections to observe how the application loads after logging in.
-
Record the runtime performance of your React application. Once done, observe the rendering order of pages and elements in the timeline Chrome produces.
If you are not convinced yet, let's explore more details on the impact of this strategy.
Imagine that you want to redirect your users to the /profile after they log in. If you were to use the root URL of your React application, http://localhost:4040, as the Auth0 Callback URL, you may hurt the user experience when the user's connection is slow or when you are lazy loading the /profile route:
- This React application offers a
/profilepage that will display user profile information such as name and email address. - Since user profile information is private, it must be protected against unauthorized access.
- The Auth0 React SDK allows you to easily require users to log in before they can access a route.
- When a user who is not logged in clicks on the
/profilepage navigation tab, Auth0 will redirect them to a page to log in. - Once your users log in, Auth0 will redirect them to your React application with some metadata that allows your application to redirect them to the protected page they intended to access.
- When you use
http://localhost:4040as the Auth0 Callback URL, Auth0 will redirect your users to the home page first. Depending on how fast your application renders pages and handles redirects, your users may see the home page first before React takes them to the/profilepage when the connection is slow or when you are lazy loading that route. This quick re-routing makes your user interface "flash", which makes the user interface feel janky or glitchy. - However, when you use
http://localhost:4040/callbackas the Auth0 Callback URL, Auth0 will take your users to a/callbackroute after they log in. You can then display a loading animation or nothing at all in that special route. Doing so makes the transition from/callbackto/profilesmoother as no unrelated or unexpected content shows up in the process.
Additionally, when you load the home page, /, you may trigger logic that fetches data from an external API or runs any other business logic related to hydrating the home page. If your intention is to show the users a /profile page after they log in, there's no need or value to run any of that home page business logic that won't impact the rendering of the /profile page. Instead, you may increase your operational costs by running unnecessary logic when any of your users log in. In that case, it's better to handle the Auth0 redirect in a minimal and performant specialized route, /callback.
Configure a React Authentication Provider
Execute the following command to install the Auth0 React SDK:
npm install @auth0/auth0-react
Under the hood, the Auth0 React SDK uses React Context. The SDK uses an Auth0Context component to manage the authentication state of your users. In turn, the SDK exposes the Auth0Provider component that provides that Auth0Context to its child components. As such, you can wrap your root component, such as App, with Auth0Provider to integrate Auth0 with your React app:
<Auth0Provider><App /></Auth0Provider>
However, user authentication is a mechanism to control who can access your application. You can integrate your application with Auth0 to prevent users who have not logged in from accessing a /profile or /admin route.
If users want to access a guarded route from your application, Auth0 will stop them and ask them to present their credentials. If Auth0 can verify who they are and that they are supposed to go in there, Auth0 will let them in.
The authentication process won't happen within your React application layer when using Auth0. Your React application will redirect your users to the Auth0 Universal Login page, where Auth0 asks for credentials and redirects the user back to your application with the result of the authentication process.
The Auth0Provider from the Auth0 React SDK remembers the route the user wanted to access and, if authentication were successful, it takes the user to that route. As such, the Auth0Provider needs to have access to the session history of the application. The starter React app uses React Router v6 to manage its routing. React Router v6 exposes a React Hook that makes it easy for you to access the session history through a history object, useNavigate().
Consequently, you need to wrap the Auth0Provider with BrowserRouter from React Router, which uses a RouterContext.Provider component under the hood to maintain the routing state:
<BrowserRouter><Auth0Provider><App /></Auth0Provider></BrowserRouter>
Here, what you see at play is a pillar of React's architecture: you extend components, not through inheritance but composition.
How do you create an Auth0Provider with access to the application session history?
Create an auth0-provider-with-navigate.js file under the src directory to define an Auth0ProviderWithNavigate component, which uses composition to make React Router Hooks available to Auth0Provider:
touch src/auth0-provider-with-navigate.js
Populate src/auth0-provider-with-navigate.js with the following:
import { Auth0Provider } from "@auth0/auth0-react";import React from "react";import { useNavigate } from "react-router-dom";export const Auth0ProviderWithNavigate = ({ children }) => {const navigate = useNavigate();const domain = process.env.REACT_APP_AUTH0_DOMAIN;const clientId = process.env.REACT_APP_AUTH0_CLIENT_ID;const redirectUri = process.env.REACT_APP_AUTH0_CALLBACK_URL;const onRedirectCallback = (appState) => {navigate(appState?.returnTo || window.location.pathname);};if (!(domain && clientId && redirectUri)) {return null;}return (<Auth0Providerdomain={domain}clientId={clientId}authorizationParams={{redirect_uri: redirectUri,}}onRedirectCallback={onRedirectCallback}>{children}</Auth0Provider>);};
What is happening within Auth0ProviderWithNavigate?
- You need the Auth0 React SDK to connect with the correct Auth0 Application to process authentication. As such, you need to configure the
Auth0Providerto use the Auth0 Domain and Client ID. - You use the
authorizationParamsconfiguration object to define the query parameters that will be sent during the call to the Auth0/authorizeendpoint. As such, you're passing here theredirect_uri, which is the URL where Auth0 will redirect your users back to your React application. - You use the
onRedirectCallback()method to handle the event where Auth0 redirects your users from the Auth0 Universal Login page to your React application.- You use the
useNavigate()hook to get thehistoryobject from React Router. You use thenavigate()method to take users back to the route they intended to access before authentication. - In the next sections of this guide, you'll create login and sign-up buttons that define the value of the
appState.returnToproperty. You'll customize the behavior of the user login experience by specifying to what route React should take your users after they authenticate with Auth0.
- You use the
That's it! Wrapping any component tree with Auth0ProviderWithNavigate will give it access to the Auth0Context.
How do you use Auth0ProviderWithNavigate?
The Auth0ProviderWithNavigate requires the BrowserRouter component from React Router to be its parent, grandparent, or great-great-great-grandparent.
The Context from React Router must be present in the component tree at a higher level for Auth0ProviderWithNavigate to access the useNavigate() hook from React Router.
Open src/index.js and update it as follows to build the proper component tree to power the routing and user authentication features of your React application:
import React from "react";import { createRoot } from "react-dom/client";import { BrowserRouter } from "react-router-dom";import { App } from "./app";import { Auth0ProviderWithNavigate } from "./auth0-provider-with-navigate";import "./styles/styles.css";const container = document.getElementById("root");const root = createRoot(container);root.render(<React.StrictMode><BrowserRouter><Auth0ProviderWithNavigate><App /></Auth0ProviderWithNavigate></BrowserRouter></React.StrictMode>);
In the next sections, you'll use the useAuth0() hook within any React component to consume the Auth0Context associated with the Auth0ProviderWithNavigate. The useAuth0() hook will give you access to the Auth0 React SDK loading state, the user authentication status, the user profile information, and helper methods that trigger events related to the authentication process.
Auth0 and React connection set
You have completed setting up an authentication service that your React application can consume. All that is left is for you to continue building up the starter project throughout this guide by implementing React components to trigger and manage the authentication flow.
Feel free to dive deeper into the Auth0 Documentation to learn more about how Auth0 helps you save time implementing and managing identity.
Add User Login to React
The steps on how to build a React login form or login page are complex. You can save development time by using a login page hosted by Auth0 that has a built-in login form that supports different types of user authentication: username and password, social login, and Multi-Factor Authentication (MFA). You just need to create a button that takes users from your React application to the login page.
Start by creating a buttons directory under the src/components directory:
mkdir src/components/buttons
Create a login-button.js file under the src/components/buttons directory:
touch src/components/buttons/login-button.js
Populate src/components/buttons/login-button.js like so:
import { useAuth0 } from "@auth0/auth0-react";import React from "react";export const LoginButton = () => {const { loginWithRedirect } = useAuth0();const handleLogin = async () => {await loginWithRedirect({appState: {returnTo: "/profile",},});};return (<button className="button__login" onClick={handleLogin}>Log In</button>);};
The loginWithRedirect() method from the Auth0Context performs a redirect to the Auth0 /authorize endpoint to kickstart the authentication process. You can pass a configuration object to this method to customize the login experience.
By setting up the value of appState.returnTo to /profile, you are telling the Auth0 React SDK the following: When my users log in with Auth0 and return to my React application, take them from the default callback URL path, /callback, to the "Profile" page, /profile. If you don't specify this appState.returnTo option, your users will be redirected by default to the / path after they log in.
This loginWithRedirect() method supports any of the RedirectLoginOptions properties to customize the user login experience. In the next section, you'll configure this method to create a button that your users can click on to sign up for your application.
Add User Sign-Up to React
The process on how to build a React sign-up form is much more complex. However, you can use a sign-up form hosted by Auth0 that has a built-in password strength verification.
You can create a button that takes users from your React application to the sign-up page by adding another property to the loginWithRedirect() configuration object: authorizationParams. The Auth0 React SDK will use the properties you define within the authorizationParams object as query parameters of the call to the Auth0 /authorize endpoint. As such, add the screen_hint property to that object with a value of signup to accomplish that goal:
authorizationParams: {screen_hint: "signup",}
To see this in practice, create a signup-button.js file under the src/components/buttons directory:
touch src/components/buttons/signup-button.js
Populate src/components/buttons/signup-button.js like so to define a sign-up button component:
import { useAuth0 } from "@auth0/auth0-react";import React from "react";export const SignupButton = () => {const { loginWithRedirect } = useAuth0();const handleSignUp = async () => {await loginWithRedirect({appState: {returnTo: "/profile",},authorizationParams: {screen_hint: "signup",},});};return (<button className="button__sign-up" onClick={handleSignUp}>Sign Up</button>);};
Using the Auth0 Signup feature requires you to enable the Auth0 New Universal Login Experience in your tenant.
Open the Universal Login section of the Auth0 Dashboard and choose the "New" option under the "Experience" subsection.
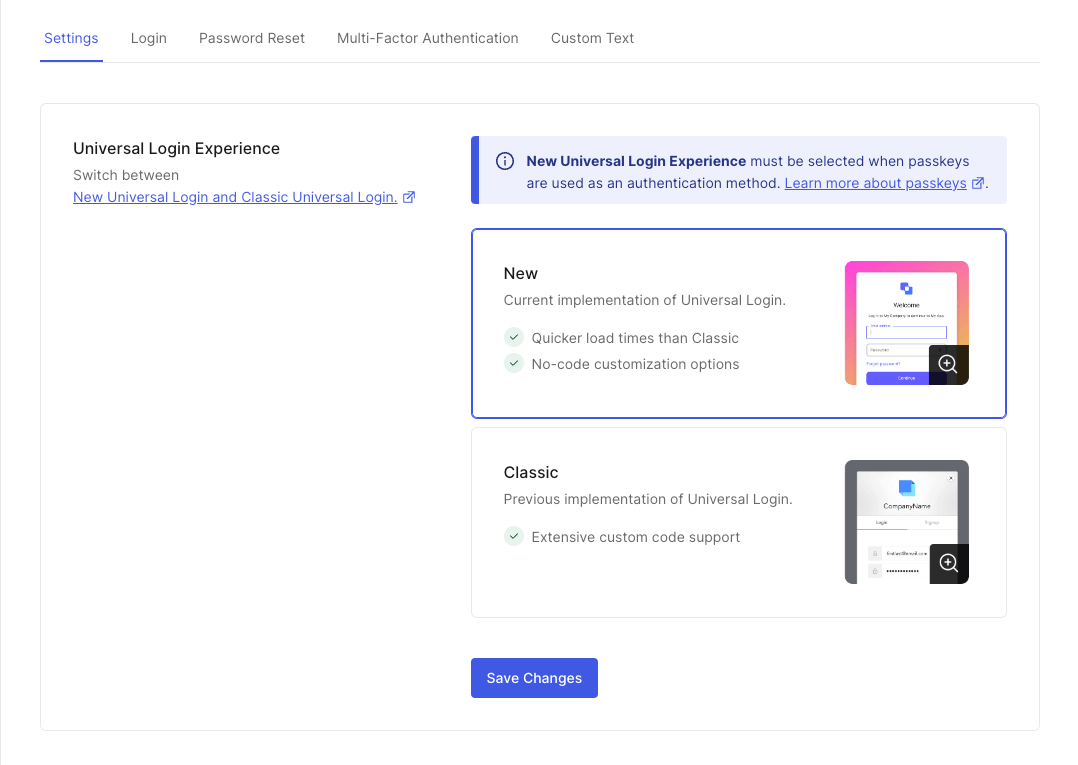
Scroll down and click on the "Save Changes" button.
The difference between the login and sign-up user experience will be more evident once you integrate those components with your React application and see them in action. You'll do that in the following sections.
Add User Logout to React
You can log out users from your React application by logging them out of their Auth0 sessions using the logout() method from the Auth0 React SDK.
Create a logout-button.js file under the src/components/buttons directory:
touch src/components/buttons/logout-button.js
Populate src/components/buttons/logout-button.js like so:
import { useAuth0 } from "@auth0/auth0-react";import React from "react";export const LogoutButton = () => {const { logout } = useAuth0();const handleLogout = () => {logout({logoutParams: {returnTo: window.location.origin,},});};return (<button className="button__logout" onClick={handleLogout}>Log Out</button>);};
When using the logout() method, the Auth0 React SDK clears the application session and redirects to the Auth0 /v2/logout endpoint to clear the Auth0 session under the hood.
As with the login method, you can pass an object argument to logout() to customize the logout behavior of the React application. You can define a logoutParams property on that configuration object to define parameters for the /v2/logout call. This process is fairly invisible to the user. See logoutParams for more details on the parameters available.
Here, you pass the logoutParams.returnTo option to specify the URL where Auth0 should redirect your users after they log out. Right now, you are working locally, and your Auth0 application's "Allowed Logout URLs" points to http://localhost:4040.
However, if you were to deploy your React application to production, you need to add the production logout URL to the "Allowed Logout URLs" list and ensure that Auth0 redirects your users to that production URL and not localhost. Setting logoutParams.returnTo to window.location.origin will do just that.
A best practice when working with Auth0 is to have different tenants for your different project environments. For example, it's recommended for developers to specify a production tenant. A production tenant gets higher rate limits than non-production tenants. Check out the "Set Up Multiple Environments" Auth0 document to learn more about how to set up development, staging, and production environments in the Auth0 Identity Platform.
Render React Components Based on Authentication
In this section, you'll learn how to render React components conditionally based on the status of the Auth0 React SDK or the authentication status of your users.
Render the authentication buttons conditionally
The React starter application features a desktop and mobile navigation experience.
When using your React application on a viewport large enough to fix a desktop or tablet experience, you'll see a navigation bar at the top of the page.
When using a viewport that fits the screen constraints of a mobile device, you'll see a menu button at the top-right corner of the page. Tapping or clicking on the menu button opens a modal that shows you the different pages that you can access in the application.
In this section, you'll expose the button components that trigger the login, sign-up, and logout events through these page navigation elements.
Let's start with the desktop navigation user experience. You'll show both the login and sign-up buttons on the navigation bar when the user is not logged in. Naturally, you'll show the logout button when the user is logged in.
Update src/components/navigation/desktop/nav-bar-buttons.js as follows to implement the user experience defined above:
import { useAuth0 } from "@auth0/auth0-react";import React from "react";import { LoginButton } from "../../buttons/login-button";import { LogoutButton } from "../../buttons/logout-button";import { SignupButton } from "../../buttons/signup-button";export const NavBarButtons = () => {const { isAuthenticated } = useAuth0();return (<div className="nav-bar__buttons">{!isAuthenticated && (<><SignupButton /><LoginButton /></>)}{isAuthenticated && (<><LogoutButton /></>)}</div>);};
The isAuthenticated value reflects the authentication state of your users as tracked by the Auth0 React SDK. This value is true when the user has been authenticated and false when not. As such, you can use the isAuthenticated value to render UI elements conditionally depending on the authentication state of your users, as you did above.
The mobile navigation experience works in the same fashion, except that the authentication-related buttons are tucked into the mobile menu modal.
Update src/components/navigation/mobile/mobile-nav-bar-buttons.js as follows:
import { useAuth0 } from "@auth0/auth0-react";import React from "react";import { LoginButton } from "../../buttons/login-button";import { LogoutButton } from "../../buttons/logout-button";import { SignupButton } from "../../buttons/signup-button";export const MobileNavBarButtons = () => {const { isAuthenticated } = useAuth0();return (<div className="mobile-nav-bar__buttons">{!isAuthenticated && (<><SignupButton /><LoginButton /></>)}{isAuthenticated && (<><LogoutButton /></>)}</div>);};
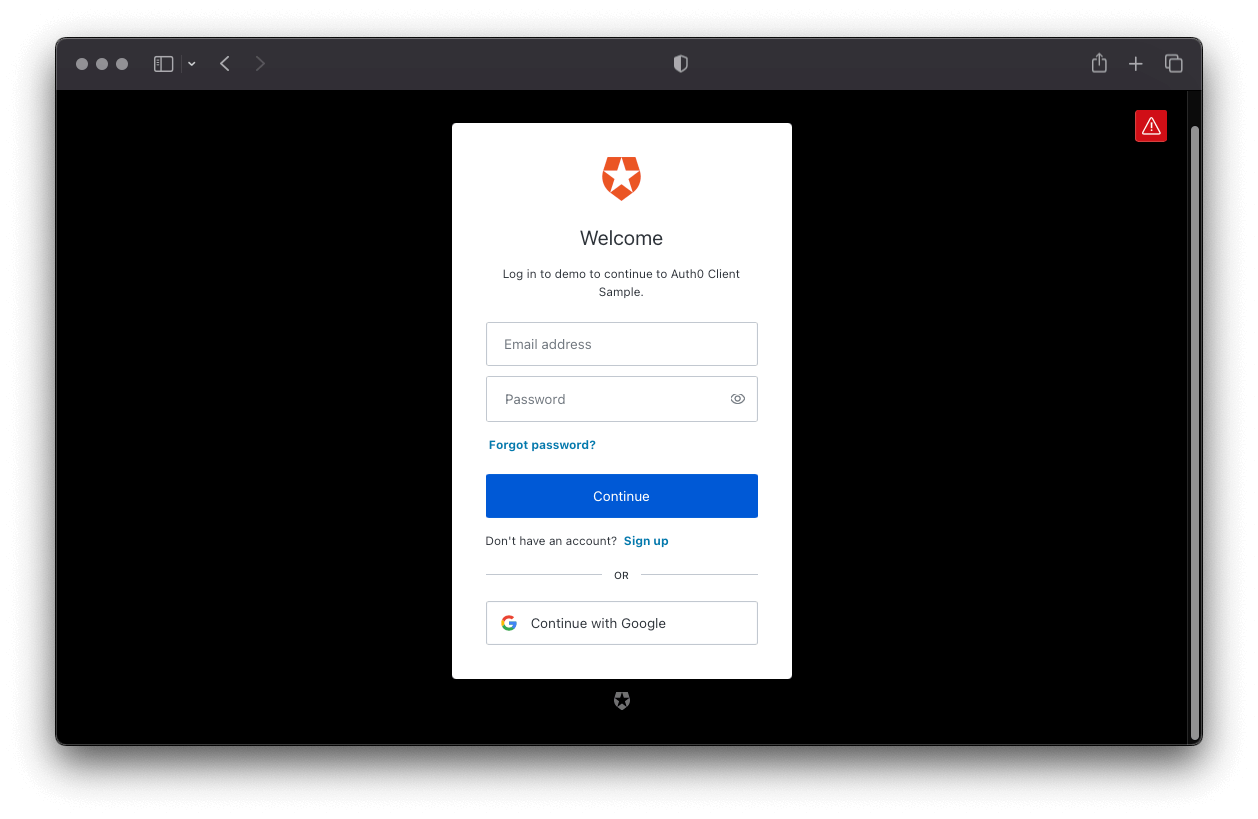
Go ahead and try to log in. Your React application redirects you to the Auth0 Universal Login page. You can use the form to log in with a username and password or a social identity provider like Google. Notice that this login page also gives you the option to sign up.
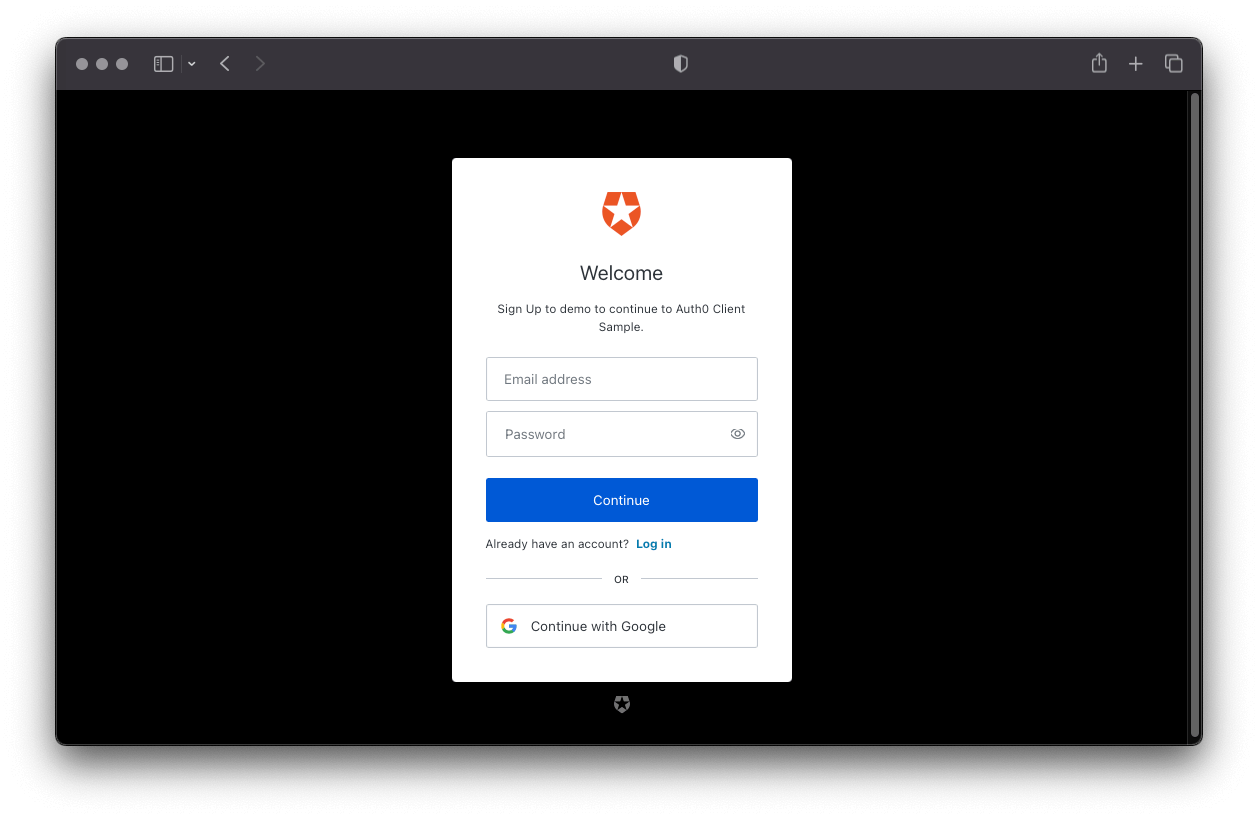
However, when you click the sign-up button from your application directly, React takes you to the Signup page, where your users can sign up for the React application. Try it out!
Notice that when you finish logging in or signing up, Auth0 redirects you to your React app, but the login and sign-up buttons may briefly show up before the logout button renders. You'll fix that next.
Render the application conditionally
The user interface flashes because your React app doesn't know if Auth0 has authenticated the user yet. Your React application will know the user authentication status after the Auth0 React SDK initializes.
To fix that UI flashing, use the isLoading value from the useAuth0() React hook to render the App component once the Auth0 React SDK has finished loading.
Open src/app.js and update it as follows:
import { useAuth0 } from "@auth0/auth0-react";import React from "react";import { Route, Routes } from "react-router-dom";import { PageLoader } from "./components/page-loader";import { AdminPage } from "./pages/admin-page";import { CallbackPage } from "./pages/callback-page";import { HomePage } from "./pages/home-page";import { NotFoundPage } from "./pages/not-found-page";import { ProfilePage } from "./pages/profile-page";import { ProtectedPage } from "./pages/protected-page";import { PublicPage } from "./pages/public-page";export const App = () => {const { isLoading } = useAuth0();if (isLoading) {return (<div className="page-layout"><PageLoader /></div>);}return (<Routes><Route path="/" element={<HomePage />} /><Route path="/profile" element={<ProfilePage />} /><Route path="/public" element={<PublicPage />} /><Route path="/protected" element={<ProtectedPage />} /><Route path="/admin" element={<AdminPage />} /><Route path="/callback" element={<CallbackPage />} /><Route path="*" element={<NotFoundPage />} /></Routes>);};
While the SDK is loading, the PageLoader component renders, which shows up an animation. Log out and log back in to see this in action. No more UI flashing should happen.
Render navigation tabs conditionally
There may be use cases where you want to hide user interface elements from users who have not logged in to your application. For this starter application, only authenticated users should see the navigation tabs to access the /protected and /admin pages.
To implement this use case, you'll rely once again on the isAuthenticated value from the useAuth0() hook.
Open the src/components/navigation/desktop/nav-bar-tabs.js component file that defines your desktop navigation tabs and update it like so:
import { useAuth0 } from "@auth0/auth0-react";import React from "react";import { NavBarTab } from "./nav-bar-tab";export const NavBarTabs = () => {const { isAuthenticated } = useAuth0();return (<div className="nav-bar__tabs"><NavBarTab path="/profile" label="Profile" /><NavBarTab path="/public" label="Public" />{isAuthenticated && (<><NavBarTab path="/protected" label="Protected" /><NavBarTab path="/admin" label="Admin" /></>)}</div>);};
Next, open the src/components/navigation/mobile/mobile-nav-bar-tabs.js component file that defines your mobile navigation tabs and update it like so:
import { useAuth0 } from "@auth0/auth0-react";import React from "react";import { MobileNavBarTab } from "./mobile-nav-bar-tab";export const MobileNavBarTabs = ({ handleClick }) => {const { isAuthenticated } = useAuth0();return (<div className="mobile-nav-bar__tabs"><MobileNavBarTabpath="/profile"label="Profile"handleClick={handleClick}/><MobileNavBarTabpath="/public"label="Public"handleClick={handleClick}/>{isAuthenticated && (<><MobileNavBarTabpath="/protected"label="Protected"handleClick={handleClick}/><MobileNavBarTabpath="/admin"label="Admin"handleClick={handleClick}/></>)}</div>);};
Log out from your React application and notice how now you can only see the tabs for the /profile and /public pages in the navigation bar, along with the login and sign-up buttons. Log in and then see the rest of the navigation bar show up.
Keep in mind that this does not restrict access to the /admin and /protected pages at all. You'll learn how to use the Auth0 React SDK to protect React routes in the next section.
Add Route Guards to React
You'll create an <AuthenticationGuard> component that requires users to log in before they can access a React route. A guard is a tool that helps you promote data privacy and protection as well as user interface customization. The <AuthenticationGuard> is a wrapper component that uses withAuthenticationRequired to make it reusable for the components that you need to protect. As such, you can pass the <AuthenticationGuard> organically as an element to the <Route> component from React Router v6.
To start, create a authentication-guard.js file under the src/components/ directory:
touch src/components/authentication-guard.js
Populate src/components/authentication-guard.js as follows:
import { withAuthenticationRequired } from "@auth0/auth0-react";import React from "react";import { PageLoader } from "./page-loader";export const AuthenticationGuard = ({ component }) => {const Component = withAuthenticationRequired(component, {onRedirecting: () => (<div className="page-layout"><PageLoader /></div>),});return <Component />;};
The withAuthenticationRequired Higher-Order Component (HOC) takes the following arguments:
-
The component that you want to protect.
-
A configuration object to customize the authentication flow,
WithAuthenticationRequiredOptions. This object takes the following optional properties:-
loginOptions: It behaves exactly like the configuration options you can pass tologinWithRedirect()to customize the login experience. -
returnTo: It lets you specify a path for React to redirect a user after the login transaction that the user triggered in this component completes. -
onRedirecting: It renders a component while your React application redirects the user to the login page.
-
-
In the example above, users who have not logged in see the <PageLoader> component as soon they hit a guarded route. The onRedirecting component improves the user experience by avoiding any flashing of mixed UI components (protected and public components).
You can apply the route guard to any React route by updating src/app.js as follows:
import { useAuth0 } from "@auth0/auth0-react";import React from "react";import { Route, Routes } from "react-router-dom";import { PageLoader } from "./components/page-loader";import { AuthenticationGuard } from "./components/authentication-guard";import { AdminPage } from "./pages/admin-page";import { CallbackPage } from "./pages/callback-page";import { HomePage } from "./pages/home-page";import { NotFoundPage } from "./pages/not-found-page";import { ProfilePage } from "./pages/profile-page";import { ProtectedPage } from "./pages/protected-page";import { PublicPage } from "./pages/public-page";export const App = () => {const { isLoading } = useAuth0();if (isLoading) {return (<div className="page-layout"><PageLoader /></div>);}return (<Routes><Route path="/" element={<HomePage />} /><Routepath="/profile"element={<AuthenticationGuard component={ProfilePage} />}/><Route path="/public" element={<PublicPage />} /><Routepath="/protected"element={<AuthenticationGuard component={ProtectedPage} />}/><Routepath="/admin"element={<AuthenticationGuard component={AdminPage} />}/><Route path="/callback" element={<CallbackPage />} /><Route path="*" element={<NotFoundPage />} /></Routes>);};
You use the <AuthenticationGuard> component to guard the /profile, /protected, and /admin routes.
You can now test that these guarded paths require users to log in before accessing them. Log out and try to access the Profile page, Protected page, or the Admin page. If it works, React redirects you to log in with Auth0.
Once you log in, React should take you to the /profile page as specified by the appState.returnTo property present in the login button component definition.
A note on React.StrictMode and React v18
While running this React v18 code sample locally in development mode, you'll notice that in some scenarios React makes the same API call twice. Open your browser's developer tools to analyze the network traffic and calls. Then, visit either the /public page, the /protected page, or the /admin page. You'll see that React calls your "Hello World" API twice.
React is working as expected. There is nothing wrong going on. React v18 makes React stricter by introducing a new development-only check to React.StrictMode, which this code sample application uses.
The React v18 changelog explains that "React will automatically unmount and remount every component, whenever a component mounts for the first time, restoring the previous state on the second mount. If this breaks your app, consider removing Strict Mode until you can fix the components to be resilient to remounting with existing state."
However, when you run your React v18 applications in production, React will only make one request.
Client-side guards improve the user experience of your React application, not its security.
In Security StackExchange, Conor Mancone explains that server-side guards are about protecting data while client-side guards are about improving user experience.
The main takeaways from his response are:
- You can't rely on client-side restrictions, such as navigation guards and protected routes, to protect sensitive information.
- Attackers can potentially get around client-side restrictions.
- Your server should not return any data that a user should not access.
The wrong approach is to return all the user data from the server and let the front-end framework decide what to display and what to hide based on the user authentication status.
- Anyone can open the browser's developer tools and inspect the network requests to view all the data.
- The use of navigation guards helps improve user experience, not user security.
- Without guards, a user who has not logged in may wander into a page with restricted information and see an error like "Access Denied".
- With guards that match the server permissions, you can prevent users from seeing errors by preventing them from visiting the restricted page.

Get User Profile Information in React
After a user successfully logs in, Auth0 sends an ID token to your React application. Authentication systems, such as Auth0, use ID Tokens in token-based authentication to cache user profile information and provide it to a client application. The caching of ID tokens can improve the performance and responsiveness of your React application.
You can use the data from the ID token to personalize the user interface of your React application. The Auth0 React SDK decodes the ID token and stores its data in the user object exposed via the useAuth0() React hook. Some of the ID token information includes the name, nickname, picture, and email of the logged-in user.
How can you use the ID token to create a profile page for your users?
Update src/pages/profile-page.js as follows:
import { useAuth0 } from "@auth0/auth0-react";import React from "react";import { CodeSnippet } from "../components/code-snippet";import { PageLayout } from "../components/page-layout";export const ProfilePage = () => {const { user } = useAuth0();if (!user) {return null;}return (<PageLayout><div className="content-layout"><h1 id="page-title" className="content__title">Profile Page</h1><div className="content__body"><p id="page-description"><span>You can use the <strong>ID Token</strong> to get the profileinformation of an authenticated user.</span><span><strong>Only authenticated users can access this page.</strong></span></p><div className="profile-grid"><div className="profile__header"><imgsrc={user.picture}alt="Profile"className="profile__avatar"/><div className="profile__headline"><h2 className="profile__title">{user.name}</h2><span className="profile__description">{user.email}</span></div></div><div className="profile__details"><CodeSnippettitle="Decoded ID Token"code={JSON.stringify(user, null, 2)}/></div></div></div></div></PageLayout>);};
What's happening within the <ProfilePage> component?
-
You display three properties from the
userobject in the user interface:name,picture, andemail. -
Since the data comes from a simple object, you don't have to fetch it using any asynchronous calls.
-
Finally, you display the full content of the decoded ID token within a code box. You can now see all the other properties available for you to use. The properties are known as "token claims".
The <ProfilePage> component renders user information that you could consider private or sensitive. Additionally, the user property is null if there is no logged-in user. So either way, this component should only render if Auth0 has authenticated the user. You are already restricting access to this page component by using the <AuthenticationGuard> component to guard the /profile route definition of your React application, src/app.js.
If you are logged in to your application, visit http://localhost:4040/profile to see your user profile details.
Authentication Beyond Passwords: Try Passkeys Today
So far, you have seen how a user can sign up or log in to your application with a username and password. However, you can free your users from having to remember yet another password by allowing them to use passkeys as a new way to log in.
Passkeys are a phishing-resistant alternative to traditional authentication factors, such as the username/password combo, that offer an easier and more secure login experience to users.
You don't have to write any new code to start using passkeys in your application. You can follow the "Authentication with Passkeys" lab to learn how to enable passkeys in your Auth0 tenant and learn more about this emerging technology. Once you complete that optional lab, you can come back to this guide to continue learning about how to access protected API resources on behalf of a user from your application.
Integrate React with an API Server
This section focuses on showing you how to get an access token in your React application and how to use it to make API calls to protected API endpoints.
When you use Auth0, you delegate the authentication process to a centralized service. Auth0 provides you with functionality to log in and log out users from your React application. However, your application may need to access protected resources from an API.
You can also protect an API with Auth0. There are multiple API quickstarts to help you integrate Auth0 with your backend platform.
When you use Auth0 to protect your API, you also delegate the authorization process to a centralized service that ensures only approved client applications can access protected resources on behalf of a user.
How can you make secure API calls from React?
Your React application authenticates the user and receives an access token from Auth0. The application can then pass that access token to your API as a credential. In turn, your API can use Auth0 libraries to verify the access token it receives from the calling application and issue a response with the desired data.
Instead of creating an API from scratch to test the authentication and authorization flow between the client and the server, you can pair this client application with an API server that matches the technology stack you use at work. The React "Hello World" client application that you have been building up can interact with any of the "Hello World" API server samples from the Auth0 Developer Center.
The "Hello World" API server samples run on http://localhost:6060 by default, which is the same origin URL and port where the mocked JSON server is running. As such, before you set up the "Hello World" API server, locate the tab where you are running the npm run api command and stop the mocked JSON server.
Pick an API code sample in your preferred backend framework and language from the list below and follow the instructions on the code sample page to set it up. Once you complete the sample API server setup, please return to this page to learn how to integrate that API server with your React application.
Call a Protected API from React
Once you have set up the API server code sample, you should have created an Auth0 Audience value. Store that value in the following field so that you can use it throughout the instructions presented on this page easily:
Now, update the .env file under the React project directory as follows:
REACT_APP_API_SERVER_URL=http://localhost:6060REACT_APP_AUTH0_DOMAIN=AUTH0-DOMAINREACT_APP_AUTH0_CLIENT_ID=AUTH0-CLIENT-IDREACT_APP_AUTH0_CALLBACK_URL=http://localhost:4040/callbackREACT_APP_AUTH0_AUDIENCE=AUTH0-AUDIENCE
You are using REACT_APP_AUTH0_AUDIENCE to add the value of your Auth0 API Audience so that your React client application can request resources from the API that such audience value represents.
Restart your development server so that your React project can become aware of these .env file changes:
npm start
Let's understand better what the REACT_APP_AUTH0_AUDIENCE and REACT_APP_API_SERVER_URL values represent.
The REACT_APP_API_SERVER_URL is simply the URL where your sample API server listens for requests. In production, you'll change this value to the URL of your live server.
Your React application must pass an access token when it calls a target API to access protected resources. You can request an access token in a format that the API can verify by passing the audience to the Auth0 React SDK.
The value of the Auth0 Audience must be the same for both the React client application and the API server you decided to set up.
Why is the Auth0 Audience value the same for both apps? Auth0 uses the audience value to determine which resource server (API) the user is authorizing your React application to access. It's like a phone number. You want to ensure that your React application "texts the right API".
As such, update the src/auth0-provider-with-navigate.js file from your React project as follows to add the audience value:
import { Auth0Provider } from "@auth0/auth0-react";import React from "react";import { useNavigate } from "react-router-dom";export const Auth0ProviderWithNavigate = ({ children }) => {const navigate = useNavigate();const domain = process.env.REACT_APP_AUTH0_DOMAIN;const clientId = process.env.REACT_APP_AUTH0_CLIENT_ID;const redirectUri = process.env.REACT_APP_AUTH0_CALLBACK_URL;const audience = process.env.REACT_APP_AUTH0_AUDIENCE;const onRedirectCallback = (appState) => {navigate(appState?.returnTo || window.location.pathname);};if (!(domain && clientId && redirectUri && audience)) {return null;}return (<Auth0Providerdomain={domain}clientId={clientId}authorizationParams={{audience: audience,redirect_uri: redirectUri,}}onRedirectCallback={onRedirectCallback}>{children}</Auth0Provider>);};
You are now including an audience property in the authorizationParams prop in the Auth0Provider.
What about using scopes?
A property that you are not configuring directly in the <Auth0Provider> is the scope property. When you don't pass a scope option to Auth0 React SDK, which powers Auth0Provider, the SDK defaults to using the OpenID Connect Scopes: openid profile email.
-
openid: This scope informs the Auth0 Authorization Server that the Client is making an OpenID Connect (OIDC) request to verify the user's identity. OpenID Connect is an authentication protocol. -
profile: This scope value requests access to the user's default profile information, such asname,nickname, andpicture. -
email: This scope value requests access to theemailandemail_verifiedinformation.
The details of the OpenID Connect Scopes go into the ID Token. However, you can define custom API scopes to implement access control. You'll identify those custom scopes in the calls that your client applications make to that API. Auth0 includes API scopes in the access token as the scope claim value.
The Auth0 React SDK provides you with a method to get an access token from Auth0: getAccessTokenSilently(). If you already have an access token stored in memory, but the token is invalid or expired, this method will get you a new one. Usually, getting new access tokens requires the user to log in again. However, The Auth0 React SDK lets you get one in the background without interrupting the user. As the name implies, it's a method to getTokenSilently()... 🤫😶
It's now time to update the /protected and /admin page components to let users retrieve private data from the API server. Please ensure that your sample API server is running as you complete the following steps.
Start by updating the service methods present in the src/services/message.service.js file as follows:
import { callExternalApi } from "./external-api.service";const apiServerUrl = process.env.REACT_APP_API_SERVER_URL;export const getPublicResource = async () => {const config = {url: `${apiServerUrl}/api/messages/public`,method: "GET",headers: {"content-type": "application/json",},};const { data, error } = await callExternalApi({ config });return {data: data || null,error,};};export const getProtectedResource = async (accessToken) => {const config = {url: `${apiServerUrl}/api/messages/protected`,method: "GET",headers: {"content-type": "application/json",Authorization: `Bearer ${accessToken}`,},};const { data, error } = await callExternalApi({ config });return {data: data || null,error,};};export const getAdminResource = async (accessToken) => {const config = {url: `${apiServerUrl}/api/messages/admin`,method: "GET",headers: {"content-type": "application/json",Authorization: `Bearer ${accessToken}`,},};const { data, error } = await callExternalApi({ config });return {data: data || null,error,};};
You are changing the signature of the getProtectedResource() and getAdminResource() methods to include an accessToken parameter.
You then pass that accessToken value as a bearer credential in the authorization header of the request config object. You make requests from your React application using the callExternalApi() helper method defined in the src/services/external-api.service.js module. callExternalApi() uses axios to make its API calls.
With the message service methods in place, proceed to update the src/pages/protected-page.js file as follows:
import { useAuth0 } from "@auth0/auth0-react";import React, { useEffect, useState } from "react";import { CodeSnippet } from "../components/code-snippet";import { PageLayout } from "../components/page-layout";import { getProtectedResource } from "../services/message.service";export const ProtectedPage = () => {const [message, setMessage] = useState("");const { getAccessTokenSilently } = useAuth0();useEffect(() => {let isMounted = true;const getMessage = async () => {const accessToken = await getAccessTokenSilently();const { data, error } = await getProtectedResource(accessToken);if (!isMounted) {return;}if (data) {setMessage(JSON.stringify(data, null, 2));}if (error) {setMessage(JSON.stringify(error, null, 2));}};getMessage();return () => {isMounted = false;};}, [getAccessTokenSilently]);return (<PageLayout><div className="content-layout"><h1 id="page-title" className="content__title">Protected Page</h1><div className="content__body"><p id="page-description"><span>This page retrieves a <strong>protected message</strong> from anexternal API.</span><span><strong>Only authenticated users can access this page.</strong></span></p><CodeSnippet title="Protected Message" code={message} /></div></div></PageLayout>);};
What is happening now within the <ProtectedPage> component?
-
You call the
getMessage()method to request data from your API server to hydrate your page. -
Within the body of the
getMessage()method, you call theasync getAccessTokenSilently()method to fetch a new access token from the Auth0 Authorization Server. Under the hood, the Auth0 React SDK triggers a call to the Auth0/oauth/tokenendpoint.- Your previous login request did not include an audience parameter. As such, the Auth0 React SDK doesn't have an access token stored in memory, and it requests a new one.
- The SDK will now store that access token in memory. For future
getAccessTokenSilently()calls, the SDK will use the stored access token and only request a new one when the stored access token expires.
-
You then use the
getProtectedResource()service method to fetch the protected message from your API server.- You pass the access token that you fetched to this service method.
- In turn,
getProtectedResource()passes that access token as a bearer credential in the authorization header of the request it makes to your API server.
-
Finally, if you retrieve the data from the server correctly, you'll display that message data in the message box. Otherwise, you'll show the corresponding error message.
Log out from your React application and log back in to get a new access token from Auth0 that includes the audience information.
Visit the http://localhost:4040/protected page and verify that you now get a valid response from the server.
Now, update the src/pages/admin-page.js file to implement the same business logic outlined before but this time using the getAdminResource() service method within the getMessage() method to retrieve the correct message:
import { useAuth0 } from "@auth0/auth0-react";import React, { useEffect, useState } from "react";import { CodeSnippet } from "../components/code-snippet";import { PageLayout } from "../components/page-layout";import { getAdminResource } from "../services/message.service";export const AdminPage = () => {const [message, setMessage] = useState("");const { getAccessTokenSilently } = useAuth0();useEffect(() => {let isMounted = true;const getMessage = async () => {const accessToken = await getAccessTokenSilently();const { data, error } = await getAdminResource(accessToken);if (!isMounted) {return;}if (data) {setMessage(JSON.stringify(data, null, 2));}if (error) {setMessage(JSON.stringify(error, null, 2));}};getMessage();return () => {isMounted = false;};}, [getAccessTokenSilently]);return (<PageLayout><div className="content-layout"><h1 id="page-title" className="content__title">Admin Page</h1><div className="content__body"><p id="page-description"><span>This page retrieves an <strong>admin message</strong> from anexternal API.</span><span><strong>Only authenticated users with the{" "}<code>read:admin-messages</code> permission should access thispage.</strong></span></p><CodeSnippet title="Admin Message" code={message} /></div></div></PageLayout>);};
That's all it takes to integrate React with an external API server that is also secured by Auth0 and to use an access token to consume protected server resources from your React client application.
Next Steps
You have implemented user authentication in React to identify your users, get user profile information, and control the content that your users can access by protecting routes and API resources.
This guide covered the most common authentication use case for a React application: simple login and logout. However, Auth0 is an extensible and flexible identity platform that can help you achieve even more. If you have a more complex use case, check out the Auth0 Architecture Scenarios to learn more about the typical architecture scenarios we have identified when working with customers on implementing Auth0.
We'll cover advanced authentication patterns and tooling in future guides, such as using a pop-up instead of redirecting users to log in, adding permissions to ID tokens, using metadata to enhance user profiles, and much more.